Friday, September 03, 2021

Keep using those M42-mount lenses on newer non-M42 bodies

 As I have written here often about M-42 mount lenses and cameras, you know how I love those Pentax Takumars.  There are many thousands of them in circulation, and most of them are still in good working order. The same can't always be said for M-42 mount bodies.  Meters die, shutters get old and cranky, and just because of age and abuse, those lovely (and some not so lovely) M-42 mount bodies can become unreliable.  Some are really heavy, too, which negates the benefit of those Takumars. 

When Pentax released their K-mount bodies, they also sold M-42 to K-mount adapters. Everything was the same as far as flange distance, so you could still keep using your screw-mount lenses on the Pentax K bodies.  However, that only allowed you to use the lens in manual stop-down mode for metering -- which you were probably already doing with a Spotmatic. So that's not a big drawback to their use.


Fast forward to today, and the best replacement would be to use one of the Vivitar V3800N K-mount bodies, which are relatively recent, as SLR bodies go.  Those bodies also appeared as other brands, such as the Promaster 2500 PK Super.  You get a lightweight body, red/green diodes for the metering, a top shutter speed of 1/2000 sec, multiple exposure capability, self-timer, a PC and shoe flash ability, and depth of field preview - because you are shooting in stop-down mode.  
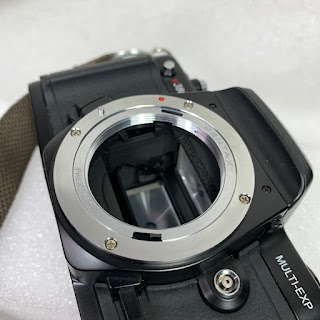
The M-42 adapter in place

Be sure to move the aperture switch to Manual

Look at that beauty.


Another option is to use a Minolta Maxxum 7000 - which are plentiful and cheap.  You can find a Sony Alpha to M-42 mount adapter, and shoot in Aperture Priority or Manual modes.  Just like that, you have an M-42 mount camera with auto film advance!  Other Minolta AF bodies may also work well with the M-42 adapter, but I have not tested them.  Again, you'll need to use the lenses in Manual, not Auto mode, so they might be a bit dim for focusing in low light conditions.


There are other M-42 mount adapters for other bodies, such as Nikon, but they don't focus to infinity. Sticking with a K-mount body and M-42 adapter is the logical choice, especially if you already have a camera such as the Pentax ME.  However, the Vivitar 3800N remains a very good and inexpensive option to continue using the wonderful range of screw-mount lenses. on a small, lightweight body with modern electronics.

Of course, there are mounts for the latest mirrorless digital cameras, but we are talking only about using film cameras here.  The M-42 Pentax Takumar lenses are compact. I have a kit with a 50mm f/1.4, 24mm f/3.5, 105mm f/2.8, and a 17mm f/4 along with a Spotmatic F, filters, etc. and it occupies about 2/3 space  and weight that a Nikon kit has with similar lenses.  

So, give those old Takumars a new life with a newer body, and adapter.  You'll quickly realize how nice those old lenses are.
Wednesday, September 01, 2021

Olympus 35 ECR- One Roll Review


Just when I think I have seen most of the small Olympus 35 series cameras, I run into one that's new to me.  I recently came across an Olympus 35 ECR, which is a pretty small rangefinder camera. Not zone-focus, like an Olympus Trip, but a real RF camera, but with absolutely no manual exposure control.  Apparently, this is a rangefinder version of the Olympus 35EC, which was a zone-focus camera with similar features.  The 35 ECR was introduced in 1972, and is a very compact camera for its time.  Olympus was no stranger to producing compact 35mm cameras, especially since they dominated the half-frame market with their series of PEN cameras.  You can download a manual from the Butkus site.

The front of the  35 ECR 


The first thing that I noticed about this camera was its compact size of 11cm x 7cm x 5cm.  Being all-metal, it weighs 430 grams without a roll of film. Pretty heavy for such a small camera. Like most cameras in its class, it has a 42mm f/2.8 lens - neither really wide nor really fast, but actually, perfect for a camera of this sort.  ASA settings are 25-800 (not bad), and the CdS light sensor is located within the front of the lens barrel, so if you use a filter, it will automatically compensate. The downside of this camera is that it originally required two 1.4V RM-640 mercury cells to operate.  I used two 1.5V A 640 Alkaline cells, so the exposure might be a bit off. I have to say, that the battery compartment is pretty robust, taking up a significant portion of the bottom plate of the camera. The rewind lever is also located on the bottom, and the tripod socket on the L side, making for a busy bottom plate, while the top plate is very minimalist. The film advance is a thumbwheel on the back.

The bottom plate is pretty busy.

I happened to have an Olympus lens hood that fits many of the Olympus 35 series cameras, so I attached it before I went out to shoot with it.  I loaded a roll of Ilford XP-2, and shot the roll on one afternoon at the Biltmore Estate in Asheville.  

Using this camera is pretty simple - just focus and shoot.  A small LED lights up to tell you that the battery has enough power to operate the camera, and if it stays on longer as you press the shutter, it means that it is in a low light situation.  There is a lever on the front that looks like a self-timer, but it is not - it's a shutter lock that probably also prevents the 2 alkaline cells from running down when not in use. The shutter is so quiet, that you may not even know that it fired.  Shutter speeds by the way, range from 4 sec to 1/800 sec, and the shutter speed/aperture (f/2.8 - f/13) is automatically set by the camera.  I would prefer that a camera have at least some bit if manual exposure control - either shutter priority or aperture priority, and this one is totally automatic.  If you are looking for that, the 35ECR will certainly be a camera to consider.

I developed the XP-2 in D-76 - yeah, I know that XP-2 is a chromogenic  C-41 film, but it does very well in traditional black and white chemistry. I felt that there was underexposure in all of the frames, but the camera did focus well.  Perhaps setting the ISO to 200 instead of 400 because of the alkaline cells would fix the underexposure.

I don't know how common this model is, but it's the first one that I have seen.  If I was looking for a compact Olympus 35 model, I'd probably go with the 35RC, just because it can be used with or without batteries, and everything is fully manual.    

A few examples from the roll of XP-2. All required some post-work to adjust the brightness.


Of course, the 42mm f/2.8 lens is sharp, and all of the images were perfectly focused.  I think that if I had compensated for the alkaline cells by setting the ISO to 200 instead of 400, it would have resulted in proper exposure.  


Monday, August 30, 2021

Cheapest Entry into Panoramas, circa 1990s

Kodak's line of 35mm single-use "disposable" cameras  began in 1988, and the branding of them as "Fun Saver" started in 1989.  They featured a plastic body with a cardstock outer shell, and like the Fuji QuickSnap, were popular with consumers well into the digital age.  They may have been inexpensive, but the production of cheap, yet sharp acrylic lenses combined with an f/11 aperture and 400 ISO film usually resulted in acceptable photos for the consumer.  In the 1989, a cropped panorama (13x36mm negative image) model appeared, called the Kodak Stretch which featured a simple finder and 12 exposures. It was renamed the Kodak Fun Saver Panoramic 35, which was produced until 1999.  The last iteration of the Fun Saver Panorama 35 featured 15 exposures, and a viewfinder that provided a relatively accurate view of the scene. Combined with a rectangular lens hood and a 25mm f/12 lens, the camera  made acceptable color panoramic images of those vacation spots to countless tourists.  They sold for about $12-$15 at the time.  The fact that all of the images on the roll were the same format made it easier for photo labs to produce the panoramic prints.  It wasn't until the appearance of the APS film format in 1996 that consumer-grade panoramic photos would once again become popular, even though they were based on an even smaller image area than the 13x36 of 35mm. 


The first version was named "Stretch 35"
Final version, late 1990s.  

I acquired a Fun Saver Panoramic 35 about 6 years ago and it sat on a shelf - I don't even recall whether I had removed the original film and processed it.  After our move to NC it was in a box, and earlier this year I decided to open it up and reload it with Ilford XP-2 film.  

While these cameras are reloadable, they are not like the Lomography Simple-Use camera or the Harman 35. They were meant to be reloaded in the factory,  so you will need to disassemble the camera before you can reload it.  The paper box covers over most of the workings of the camera, with access only for the shutter button, frame number, viewfinder, film advance, and lens.  To remove it from the box, you need to remove the lens shade, which is held in place by two prongs.   Once you remove the lens shade, the camera slides out of the cardstock box covering.  


To open up the camera, look for an embossed label on the side and insert a small screwdriver a small screwdriver to pop the back open.  You'll see that the film cassette is on the take-up side, and the supply side is an empty spool.  You'll need to go into a darkroom or use a changing bag to roll film onto the supply spool and then place the two ends back into the body and close it up.  It works better with hand reloads, because the film counter only goes to 15, and if you have a 24 exposure roll of film, it will not expose the remaining frames.  I suggest either Ilford XP-2, Kentmere 400, Kodak Tri-X, or Fomapan 400.  


You'll need to reset the frame counter by slightly lifting the clear top cover away and rotate the frame counter disk counter clockwise until 15 shows up in the raised window.  You will not be able to take any photos without doing this. You should do this before you load the film into the camera.

Once those steps are done, reattach the back - it should snap into place without too much effort.  You may want to super glue the lens hood in place because one of the prongs will have probably lost a tooth when you removed it.

Use some black paper tape to seal along the edges, just to avoid a light leak. Now you are ready to shoot with this fun little camera.

I did all these things before I found out about the wonderful panoramic images done with this camera by Deon Reynolds on The Darkroom web site.  Reynolds adds a yellow filter to get more contrast with the sky when he uses a black and white film, such as Kodak Tri-X. Remove the pano mask and insert the gel filter right behind the lens and replace the mask. His images are really good, and will make you rethink what disposable cameras can do. 

The following images were shot on expired Ilford XP-2, developed in D-76.


So, my first attempts with my reloaded Fun Saver Pano were pretty good. I shot mostly along the Blue Ridge Parkway near Asheville NC, with a few shots at the end of the roll from New Jersey. I have to say that I was impressed.  The key thing here is that the Fun Saver Pano 35 has a 25mm f/12 lens, which is perfect for the format.  You want a wide-angle in panoramic format, to get the most of the effect. 

I picked up two more empty Fun Saver Panoramic 35's for $1 plus shipping on eBay, so now I have three to take on my next road trip.


Friday, August 13, 2021

Shooting 41 Years Expired HP-5


I recently acquired a bunch of rolls of Ilford HP-5 that expired in Sept. 1980. Now, you know that I like testing the limits of what one can get from expired film, and a black and white 35mm film that's that old probably is going to be disappointing, right?  Well, follow along and see.

In 1980, I was working on my Master's degree in Entomology at the SUNY College of Environmental Science and Forestry in Syracuse, NY.  It was the year that I spent over 2 weeks on the road to the Southwest on a field trip.  I used a Pentax Spotmatic that I borrowed from my advisor, and shot Kodachrome and Ektachrome along that journey - and I still have those slides.  It was my first experience with the wide open West, and I learned quite a bit on that trip.  I am sure that I did not know a whit about Ilford film back then, as I was so used to the ever-present Kodak, though I know I did shoot some awful GAF slide film prior to 1980.  

In 1980, Jimmy Carter was in the last year of a pivotal presidency.  In 1980, PacMan appeared as an arcade game, and Post-it notes were sold for the first time. That was also the year of the fantastic "Miracle on Ice in lake Placid, NY, as the under-dog USA Hockey team beat the Soviet Union in the winter Olympics. Believe me, that was an exciting game.  It was also the year that Mount St. Helens erupted, causing significant destruction and altering the regional climate for a short time. It was the year the 7 rolls of Ilford HP-5 "expired," locked away in someone's closet or camera bag to resurface 41 years later in a donation of photographic equipment.

As I examined the boxes of film, I realized that Ilford had done some things with the packaging that I had not seen before.  Each plastic canister was sealed with a plastic strip that has to be torn away to open it and remove the film. The film has the typical long "Leica leader" that used to be on 35mm films, but probably stopped by the early 1980s.  The film cassette is reusable, as the ends can easily be removed.  Of course, the box also housed printed instructions on a sheet of paper. Interesting note, is that the instructions tell you to expose at 1/250 sec at f/16 under a full sun.  That's overexposing the film by a stop if it is rated at ISO 400. Also, the film is HP-5, not HP-5+, still rated at 400 ASA.  


At first I thought it would be stupid to test the film, but then I realized it would be a good opportunity to see just what I could do with it.  I have shot long-expired Kodak Verichrome Pan with good results, as well as Kodak Panatomic-X. However, they are not fast films, and age better than a 400 ISO film.  Using my rule of thumb of losing a stop every decade, and factoring in that the film is black and white, I decided to shoot it at ISO 50.  I loaded a Vivitar V3800N SLR with the film and shot it all in one day in Weaverville. The V3800N is one of the cheaper SLRs that appears as many different brandings, but it's certainly capable enough for this simple test. I didn't bracket any of the shots, and used sunny-16 and the camera's meter to adjust my exposures.

In the afternoon, I developed the film in HC-110B for 5 minutes. I chose HC-110 because it seems to limit fogging on old films.  As I pulled the developed film off the reel to hang it to dry, I was really pleased to see that I had images. The film has significant base fog, but I knew that it would scan pretty well.  

I scanned the negs with my Epson V700 scanner, and the thumbnails of the pre-scan looked really good. The film has a slight cupping, like Kodak Tri-X, making the center of the scan a little less sharp. There are some blotchy lines across the length of some of the frames - and I don't know what they are due to.  Here are some of the scans below.You can see that they are little grainy, but overall, not bad.  My guess of shooting it at ISO 50 was correct. I certainly did not expect that the results would be as good as they are.


It's hard to judge the results without knowing the history of how a film was stored over its lifespan.  It could have been in any number of places, and I doubt that any of them would be a freezer.  The exciting fact is that this film, probably produced in 1978 or 79 is still usable (with some adjustment).  

I know that some people wonder why in hell anyone would use long-expired film. I certainly would not use it for anything critical, but part of the fun is seeing how much life that old roll of silver halides still has after all these years.  It's also a of a treasure hunt - sometimes one can find some film that will really amaze with its staying power. Other times, it's a dud.  These rolls of HP-5 are usable, but not without some minor flaws.  However, one person's grainy negative is another person's art niche.  I may put the remaining rolls up on Etsy, so check it out soon.


Tuesday, August 03, 2021

Secreted Away

 It's always gratifying to have an image accepted for a publication.  These days, there are so many people submitting work to magazines and judged exhibits that it must be overwhelming for those people that have to review the work.  I suppose that's the rationale for so many zines out there - self-publish to get your work in the hands of others.  Online galleries are nice, but having an image in print is the real thing in your hands.  While I view Monochrome Mania as my personal outlet for my work, you'll never see it on a newsstand.  So, getting an image in a magazine with a larger audience is pretty exciting.  It's not my first published image, for sure, but nevertheless, it's very gratifying.


After I returned from my trip to NY and NJ, I was going through may mail, and opened up the envelope from SHOTS Magazine - a quarterly journal of black and white photography.  The theme for the summer issue (#152) is Secret Worlds, and of the 6 images I entered, one was selected, which appears on page 43 - shown below.  The title is "Secreted Away", and the subject is an old wood card file with one drawer open. The story behind the subject isn't given, but I will explain it here


Secreted Away

The photo was taken in 2014 in the Bird Division in the old Museum of Zoology that was housed in the Ruthven Museums Building (University of Michigan), as we were preparing for a major move. One of the things about that building was the pervasive sense of history one would get after working there for a while. That wood card file contained thousands of 3x5 cards with observation data of various bird species from over a century ago.  I suppose some of that has been digitized by now, because the data is valuable. However, secreted away in those old file drawers meant that one would have to know that the cards were there.  I worked as a collection manager at the Museum of Zoology from 1981 - 2016, and wish that I had photographed it when I first started working there.  

In 2016, the University started moving all of the collections, artifacts, files, books, and people from the main campus natural history museums to an off-campus state-of-the-art facility in a renovated warehouse on Varsity Drive.  I retired from the University at the end of 2017, having overseen the move of our insect collections and related materials.  The new facility is a sterile building that does not have the character or comforting feel of the old Ruthven Museums.  I no longer live in Ann Arbor, and my museum days are past, but sometime, I will have to compile some images of the "old museum" into a publication just so no one forgets what a great, if dated, place that it was. 

By the way, SHOTS Magazine is an awesome photography journal.