Wednesday, February 22, 2023

Tried and true, the Minolta SRT 202

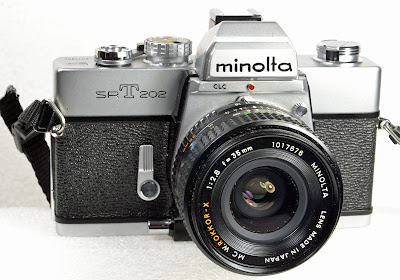
My Minolta SRT 202


At risk of being thought of as a Nikon snob, it’s time to look at another SLR system that can still be found at a decent price. The Minolta SRT series features fully manual operation, the great “lollipop and stick” match-needle meter indicator, relatively robust construction, and the choice of lots of excellent Rokkor glass to choose from.  The first SRT, the 101, appeared in 1966, replacing the SR series of SLRs.  The T in SRT stands for TTL metering, and accordingly, the old SR-mount lenses were replaced with MC lenses, which are the same mount, but with the ability to transfer the aperture reading to the meter, via a tab on the base of the lens, much like Nikon’s AI lenses.  While the SRT series was produced for over a decade, each iteration of models have slight improvements over the years.  It was after these cameras that Minolta went to more electronics and automation, starting with the X series in the mid-70s.  


The SRT 101, 102, 202 are all quite similar cameras, with the 202 being released in 1975.  The last camera of the SRT series was the SRT 200, which was released in 1977, and it was much like its predecessor, the SRT 100, which was a cheaper version of the SRT 101, and lacked some of the features, with a 1/500 sec max shutter speed.  The SRT 200’s max shutter speed was 1/1000 sec.  All of the SRT models have a cloth, horizontally-traveling shutter curtain, match-needle metering, and required a 1.35v Mercury cell for the meter.


The thing to remember with the SRT series is that most of those cameras are now around 50 years old.  Some of them may not have been treated kindly, and Minolta’s SLRs do not have the quality of build as say, a Nikon Nikkormat.  The meters can operate with a modern 1.5V PX-625A cell, but you’ll need to compensate for the voltage difference by rating your film 1 stop slower - such as setting the ISO dial to 200 for 400 ISO film.  You can also purchase an MR-9 battery adapter that reduces the voltage from a normal AG13 button cell which cost about $30, but can be used in any camera that requires a PX-625 cell. Beware of imitators- some are advertised as such, but do not reduce the voltage.


Once you have acquired a good working SRT202 or 102, you’ll be instantly surprised at how simple it is to operate. You use the meter in the viewfinder to align the “lollipop” with the “stick” - either by adjusting the aperture, the shutter speed, or both to what should be a satisfactory exposure.  The lens is easily focused in the viewfinder, and once you are happy with the composition, press the shutter button after the film has been wound.  This is really basic stuff, and if you use the camera for a couple of rolls of film, you will find it easier to operate each time.  The beauty of the SRT 202 is that the aperture and shutter speed are both seen in the viewfinder, so you don’t have to look at the control knobs while adjusting for a proper exposure.


I highly recommend the 50mm f/1.4 lens, and if you find a 45mm f/2 Rokkor-X lens, get one. It’s sort of a pancake lens, takes up little space, and is a good all-around normal lens.  My other choice, if you have been reading this blog, would be the 35mm f/2.8 Rokkor-X lens.  Beyond that, whether you are going for wide-angle or telephoto, there’s plenty of lens choices in the MC and MD lens line. .  I used to do a lot of macrophotography with my Minolta X-700, and Minolta’s macro accessories are some of the best that you’ll find.  


Let’s get back to the SRT202  and its siblings.  

The SRT 202 can meter with films with an ISO ranging from 6 to 1600.  That is pretty impressive, as many SLRs from that period typically have a minimum ISO setting of 25.  Of course, if you use an external meter, that may not matter much.  Nonetheless, there are some very interesting low ISO films out there to try.  If your camera’s meter is working properly, that really makes using the camera so much simpler.  Remember to turn on the meter using the switch on the bottom of the camera.  Turn it off when stowing the camera for any length of time.


Flash photography - any simple single-contact flash unit that uses the standard hot shoe or via a pc cord (x-sync) will allow you to take photographs using strobe flash.  It really doesn’t matter who the manufacturer is, but Vivitar and Sunpak flashes work well, and there are a lot to choose from in the used market, for next to nothing.  Auto-thyristor flashes are preferred, as they give off the proper amount of light for a particular ISO setting and aperture.  The SRT 202 has a maximum flash sync speed of 1/60 sec (in red on the dial), so to use a flash, you would use a 1/60 sec or slower shutter speed.

The main thing with the SRT series is that they are relatively simple cameras to operate, and are excellent manual cameras.  The thing to remember when buying used, is that they newest of them are nearly 50 years old,  and not all of them were treated well by previous owners.  The most common problems you’ll encounter are non-working light meters, jammed film advances, or inaccurate shutters.  That doesn’t mean that every SRT will have problems, but when trying one out, those are key things to look for. If the meter isn’t working, that’s easily overcome, but the other problems are not.  Having said that, I see far more X-series Minolta SLRs with problems, so stick with the all-manual SRTs.
The one feature that the SRT 202 lacks is mirror lockup - a feature that I have very rarely used.  If you have your camera mounted securely on a tripod and are making Bulb  exposures, using a cable release is a good idea.  For 1 sec exposures and up, you could just use the self-timer to avoid shaking the camera.  Mirror lockup is just one of those features that most of us never use.

The source for the manual images here


The SRT cameras do not sell for a lot, so you should be able to purchase one on eBay in working condition at prices from $30 - $200, depending on whether the camera has been tested or not, etc.  For $30 or less it might make sense to buy a camera that is “untested”, but some sellers actually are offering tested, repaired, and guaranteed SRT 202 cameras for about $180 - which seems pretty fair to me in light that there would not be any problems post-sale.


So, while yes, there are other camera brands out there, given the number of excellent Minolta lenses at decent prices, it makes sense to give a Minolta SRT 202, or 102, etc., a chance and see if it's the right fit for you.  


The simplicity of the control layout is a plus.

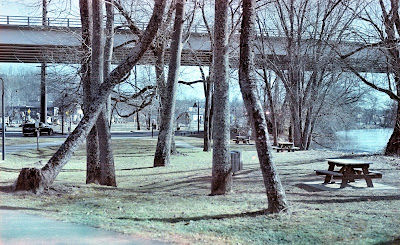
 A few images from this camera, all with Kentmere 400:



Monday, February 13, 2023

Eastman 5243 Internegative Film

Sometimes it's fun to just try things and see what happens...


My buddy Bill Pivetta gave me an unopened 1000 ft reel of 35mm motion picture stock last summer, and until recently, it sat in the fridge.  I finally got around to spooling up some of that 1000 ft reel into a 35mm bulk loader, and from that, I loaded up a couple of 35mm cassettes.  The “mystery film” is Eastman 5243 color internegative film.  It’s been really difficult to find much information about it, except that it was used in Star Wars (1977) to produce the final negative for the positive copies for distribution.  The database of film stocks indicates that this film was discontinued in the late 1950s, but that is not the case.  These big reels of film appear to be relatively “recent” - perhaps from the 1980s.  In any case, I was intrigued to see what I might get from this film.  Knowing that similar special-purpose cine films have a low ISO, I decided on an ISO of 1.5, which is 2 stops more exposure than my F4’s lowest ISO setting. So, I just set the exposure compensation dial to +2, giving me an ISO of 1.5 for in-camera metering purposes.  While shooting, I bracketed from +2 to +1 and 0, for an estimated ISO of 1.5, 3.0, and 6.   On a full sunny day, sunny-16 for this film would be about 1 second at f/16, or about 1/15 sec at f/4.  


I shot the roll in the River Arts District, and developed the film in C-41 chemistry along with a roll of Kodak Vision 3 500T.  Before developing, I gave the two rolls a good soak in an alkaline solution of Sodium bicarbonate and Sodium carbonate, and then shook the tank like a cocktail shaker for 4 rinses to get as much remjet off the films as possible - about 99%. I then proceeded to do a typical developer and blix, followed by a series of washes.


before  scanning

The resulting negative has a greenish base, and while the base was rather dense, I could see the negatives, and my eye says the ISO 1.5 was pretty close.  Scanning gave me some interesting results.  For one, it’s obvious that the film has lost some color sensitivity, and I don’t know if the blue-green base color is merely the result of age - which it certainly could be, or a factor of age and storage conditions.  I don’t think the film was refrigerated.  The color matrix in the first image shows how the film now records colors.   The grain is fine, as I would expect from an internegative film.  There is some odd coloration in some frames - and perhaps that’s from age, as this was the beginning of the large roll.  With some post processing in my favorite image editor (Corel Paint Shop Pro), I did some fade correction and exposure correction.  The resulting colors are muted, and some people might find them very appealing.  


5243 color chart after some tweaking


color chart as it's supposed to look (iphone)

I don’t think there would be all that much difference had I developed the film in ECN-2 chemistry.  After all, this is a special purpose, slow cine film that’s probably at least 40 years old.  I may try another roll soon and see how it goes.  However, that’s the beauty of testing a strange film --strange results.   I don’t know if there would be enough interest for me to sell any reloaded 35mm cassettes with the 5243 film at ISO 1.5.  Obviously there’s no guarantee on the results, but if you are interested in acquiring a few rolls of 5243 at a low price, let me know (USA only), as I have almost 1000 feet of it... 


before any corrections


For  comparison, here is a frame from Vision 500T developed in the same tank:

Vision 500T, Nikon FE10.


Wednesday, February 01, 2023

Becoming a Confident Photographer


Over the years that I have been writing this blog (since late 2004), it’s become sort of a series of articles about cameras, film, lenses, and some how-to posts.  Occasionally, I dip into travelogues and news about the field.   A few times, I discuss more intangible things.  Back in early November, I visited Manteo, NC and the Outer Banks.  Although we have lived in NC since mid-2019, it was my first trip to coastal NC since our move here, which is a 7-8 hour drive, or 444 miles to Manteo.  It’s been nearly 30 years since I’d been to the Outer Banks, and while I have some memories from that trip, I was never in one place long enough to really appreciate the area, and it was before I was a serious photographer.  

This trip was a good getaway for 4 nights in Manteo, the largest town on Roanoke Island  - and the gateway to the Outer Banks.  I had brought my Nikon F3HP and my Nikon FE, my Fujica GL690, as well as some toy cameras, including the Ansco Pix Panorama and the Lomo Sprocket Rocket.  The only digital was my iPhone.  Early November may seem like an odd time to visit the Outer Banks, but most of the tourists are gone, the weather is usually good, and lodging is a bit cheaper.  We rented a cottage right in Manteo, and everything was walkable to the waterfront. I used the F3 only with b&w film, and the FE had only Kodak Pro Image 100.  Most of the film I shoot is b&w, no matter the format, but having one camera with color for colorful subjects is always a good idea.

Bodie Island Lighthouse, Ansco Pix Panorama, Kentmere 100

On a trip such as this one, I tend to stick to a couple of films, and I chose HP-5+ and Kentmere 100 for the F3.  My main lens was the 35mm f/2 Nikkor, but I occasionally used other lenses when I thought it was necessary - the 24mm f/2.8 Nikkor, 56mm f/1.6 Lensbaby Velvet, 85mm f/2 Nikkor, and the 75-150mm f/4 Series E telephoto.   For the FE, I only used the 50mm f/2 Nikkor.  The only other b&w film I shot was a roll of Rollei RPX 25, on a dramatic windy day along the coast of the Cape Hatteras National Seashore. 

Elizabeth II, Nikon F3HP, Series E 75-150 zoom, HP-5

Now, what does the title of this post have to do with the above information?  Well, as I was shooting the scenes that I encountered, I was quite sure that I would get some really good photographs.  I was confident in my equipment and lens choices, I was using films that I had a long experience with, and I was confident in my decisions of aperture and points of view.  This is not always the case for many photographers, and certainly, not true of me years ago.  Confidence really only comes with experience.  Had I used a camera that I was less familiar with, or a different film stock that I was unsure about, a good photo might not have resulted.  

big winds, big waves.  Nikon F3HP, HP-5.


To people getting started in photography, and especially in using film, you should try keeping things simple until you understand the capabilities and limitations of the equipment and films that you are using.  It doesn't just end with the film stock, but how it's developed.  There are a lot of folks that would have had some great images, but screwed up in the film developing.  It's less likely to happen if you are consistent in your film, techniques, and developers.  

Nikon F3HP, Lensbaby Velvet 56, HP-5

Let me explain via my way of working.  I have owned my Nikon F3HP since 2008, and it's still in mint condition because I have certainly taken care with it.  While I have many other Nikon bodies, I'm very fond of the F3 because of the way it handles, and it's very dependable.  Because I wear glasses, I really appreciate the high-eyepoint prism and viewfinder.  So, I see pretty much all of what is going to be in the negative.  Second, the 35mm f/2 Nikkor has become my walk-around lens with this camera, and I know that the lens is going to render things perfectly.  I used Kentmere 100 and the HP-5+ because I like the results with those films, and I have always had good experiences with them in the developing tanks, plus they scan really well.  There have been times when I might try any number of odd films, but on a trip such as this one, I stayed with the tried and true to get the images I wanted.  Was I confident in my ability? Of course, I was.  When I ended up looking at the negatives,  and then the scans, I was really happy to see that everything came out the way I had envisioned.  

Cape Hatteras National Seashore, Nikon F3HP, RPX25


Now, to throw some uncertainty in -- I was also shooting with an Ansco Pix Panorama camera - a toy camera with a 2 element 28mm lens and a 13x36mm cropped frame. I had loaded it with Kentmere 100 - which on a sunny day is perfect, but in the days at the Outer Banks, I had only used it on cloudy days.  I didn't know if anything that I shot with it would be satisfactory.  But, that's one of the joys of using such cameras - any time things work out great with it, it's as if I have been given a gift.  I was confident in my choice of image framing, but to have satisfactory results was indeed, a great thing.  I also shot a roll of Lomochrome Purple in my Sprocket Rocket, which gives me a 24x72mm panoramic negative.  In this case, I really had no idea of how the images might appear, since it’s a strange film, and a pretty simple camera.  But then again, it’s always a bonus when those things work out.  One also has to be able to not over-think things and just let it play out. After I developed the film and scanned it in, it was apparent that while there were a handful of shots I really liked, that film isn’t the best for overcast days.

Bodie Is. Lighthouse, Sprocket Rocket, Lomochrome Purple


Becoming a confident photographer is not always going to result in great images, because well, that’s the thing about photography.  Just when you think you are doing great, it’s always possible for the photo gods to thwart you with any number of things to mess you up - such as setting the camera at the highest shutter speed instead of A (for aperture priority) and not realizing it because you are so enamored with the scenes in front of you.  Forgetting what film was in the camera and using a red filter with a color film,  forgetting to change the ISO setting for the new roll of film, or realizing that after the 36th frame, that the film never got properly seated in the take-up spool, and you have been shooting blanks for the past hour.  Then of course, are the darkroom foibles.  The thing is, each of these missteps are bits of experience, and make one a more confident and more competent photographer.  If any photographer tells you that none of these things have ever happened to them, it’s quite possible that he or she is lying, or that they haven’t been doing it long enough.  


My point is, becoming confident is achieved by using your tools every day, and keeping the process of photography simple.  I can say this, after 20+ years of serious photography-- that while trying different films and developers is perfectly okay, you’ll eventually decide on what films give you results consistent with your expectations.  Stick with them.  The same goes for cameras and lenses.  I’m a poor example of that aspect, but in my years of experience, it’s helped me to be able to know all about different cameras and films, because I do like to educate others about photography.  But in the end, I know exactly what gear that I’ll take to get the shots I want.  

hunting cabin, Alligator River NWR, Nikon FE, Pro Image 100

Having confidence in your equipment is important.  If you are starting out in photography, nothing is more discouraging than a camera that isn’t working properly.  There is a reason why a an SLR such as the Pentax K1000 has been recommended as a starter SLR - there are very few things that can go wrong, because the camera is so limited in its suite of controls - but it does have the basics.  A K1000 isn’t my favorite camera by any means, but one that works properly with a decent lens puts the basic elements of control - aperture, shutter speed, and focus at your fingertips.  You need only to compose and pick the best choice for exposure to make an image.  Use a bare-bones SLR and one or two film types for a year, and you’ll be amazed at how much better a photographer you are at the end of the year - and I mean use it every day, when possible  The same can be said for any camera, whether it is film or digital.  Use it with the same lens, and shoot almost every day, and see how you progress.  

Moon Jellyfish, NC Aquarium, Nikon FE, Pro Image 100


The world of photography is a huge umbrella, with all sorts of niche endeavors, types of equipment, digital and film, alt-process, hybrid workflows, and then types of subject matter.  You cannot possibly do it all, but whatever you do, become good at doing it.  Maybe it’s large format - which is something that I have never really had the patience for.  Maybe you are really into alternative processes, and all the best to you going down that rabbit hole, which is part alchemy and mastering the technical aspects.  I have respect for anyone that chooses to do things the hard way and can produce wonderful images.   That’s what I love about photography - there really is no "best way" - there are just ways that work for the person doing it.  For a long time it was considered that knowing and practicing the Zone System would lead you into producing better results.  I don’t think a lot of street photographers would agree with that, but if you want to use the Zone System, go for it.  There’s merit in knowing enough about it to at least understand it and applying the principles when it seems necessary.  However, millions of photographs have been made without ever thinking about the Zone System. 


salt marsh and islands, Manteo, Nikon F3HP, HP-5

Another interesting choice is not just the film size, but the aspect ratio of the images.  Square format (6x6) on 120 film is a favorite for many, but then there are those that prefer 6x7 or 6x9, or 6x17! Each of those negative sizes are different ways of seeing, and the same scene shot in each format has very different qualities.  You may find that you like square format the best, because you don’t have to worry about landscape vs portrait orientation.  

Manteo marina, Nikon F3HP, Kentmere 100

Every choice you make has an effect on the final image, from pre-visualization (if you do that), to camera, lens, film stock, filters, tripod or not, lighting, scene choice, and intangible factors such as mood (including yours, of course), intent of the photograph, and so on.  At some point, the factors that you can control become secondary to the point of the image.  It’s not that they don’t matter - but if you are a confident photographer, you hardly have to think about them, and instead think about the image.  

worn dock, Manteo, Nikon F3HP, Kentmere 100


Manteo, Nikon F3HP, Kentmere 100


If you become confident in yourself and your gear, I think you’ll find that it becomes a lot more fun to go out and make images, and your results will also be more rewarding.  At it’s most basic level, photography is pretty simple. Don’t worry so much about gear - though it is important, but the most important tool in photography is located between the ears and behind the eyes.

Nags Head Preserve, Nikon F3HP, Lensbaby Velvet 56, Kentmere 100