Monday, January 18, 2010

The wider view - 35mm in your Holga

Huron River

Last month I bought a 35mm adapter kit to use in one of my Holga cameras. The ebay seller in China was offering them as a Buy-It-Now with shipping for about $13. I figured that I may as well go for it, as the prices elsewhere were much higher. A few weeks later the item arrived in a neat little package. It consists of a new back, mask with film holder, and two stickers (more about them later) for the wind knob, as well as an instruction sheet.


Now, there are ways that you can use 35mm in a holga with minimal purchase. Tape over the red window, make a mask yourself, etc., and there are instructions online for doing just that. All of them are somewhat kludgy, and this kit is pretty simple and straightforward.

1. Remove the existing camera back and the 6x6 or 6x4.5 mask that is already in place inside the Holga.


2. Insert the new 35mm mask -- it basically gives you a 24x55mm (excluding the sprocket hole area) negative. Note that the 35mm canister fits into a niche on the left side of the camera.


3. Insert film canister and tape end of film leader to the 120 take-up spool. Start winding the film onto the spool and then attach the new back.


4. Now you are ready to go and shoot some film.

The 24x55 negative size is slightly longer than a frame and a half. Not quite what one would consider "panoramic", but it's not bad, and gives me a whole different type of image from the Holga. It's obviously better than the cropped 24x36 image that is called "panoramic" with the point and shoot cameras, which is about 12x36mm. Note that in the photograph above, I used an old roll of film that I have used before to test out winding schemes with 120 cameras and 35mm film. That's why there are marks on the film. If you simply wind the film for 36 clicks of the winding knob, you will get no overlap on your images. However, as the rolled film gets fatter, the images will be spaced out unevenly, unless you reduce the number of clicks as you shoot through the roll of film. That's what I found out before I realized what the stickers are for.


When you wind on to the first exposure (determined by the "1" on the knob, and then to the second, note that it's almost a turn and a half, or 36 clicks. From 2 to 3, it's maybe 34 clicks, and so on in decreasing order, so just pay attention to the numbers on the wind knob as you progress along the roll of film. That will keep the frames evenly spaced apart.

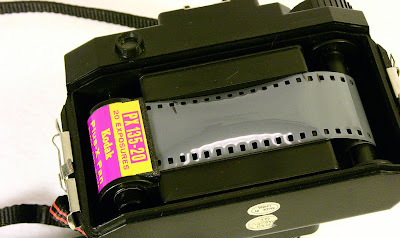
Now what? Once you get to the end of the roll, you will need to have a black cloth film changing bag or a darkroom so that you can open up the camera and remove the cassette, still with the film attached to the winding spool, and then rewind the film back INTO the 35mm cassette. It will look like this (but since you are in the dark, you should not see THIS.


DO NOT, I repeat, DO NOT open the camera to rewind the film in the light. You will lose all your images. This may seem obvious, but after reading threads on Flickr, I no longer believe common sense has permeated the latest generation, especially one that has only grown up with digital.

Once you have removed the cassette, you can either develop the film yourself, or if it is C-41 or E-6, take it to your local processor, and make sure that they DO NOT CUT the film strip after developing! These are not standard 24x36mm frames. Nor will they be able to print them. That, my friend, means that you will have to scan them yourself. If you shot regular b&w film, you'll have to make a mask for your enlarger (just mask a 6x6 holder) as the standard 35mm film mask won't get all the image.

This is a lot of fun. You will have to frame your subjects in the Holga viewfinder so that the center contains the image you want to shoot.

derailed

I look forward to doing more with this!

Thursday, January 14, 2010

Mellow Yellow?


I was at the local Urban Outfitters before Christmas, and I picked one these cameras up for my daughter. It's the camera marketed by Superheadz that's a replacement for the much sought-after Vivitar Ultra Wide and Slim (VUWS) camera. With a 22mm lens, this camera is much wider in the field of view than any other cheap point and shoot. It's got a cult following now, too. Unfortunately the VUWS is no longer sold, but the Superheadz version (in various colors with goofy names) is available. You might get lucky and find a VUWS in a local thrift shop for a buck or two, so keep your eyes open. I walked by UO the other day and saw that they still had two sitting on the shelf, so I bought one for myself. At $20, it's certainly pricey for a small plastic camera. Then again, the online price for these is $38! I'll try and shoot with it this weekend and see what I get. I'm sure I won't lose it with this color. Of course, there is a Flickr group...

Tuesday, January 12, 2010

First Impressions on the Gakken-Flex

The Mighty Gakken-flex

In early December I purchased a Gakken-flex kit from a Flickr contact (mijonju) in Japan. The Gakken-flex, for those that must never have looked online, is a 35mm twin-lens reflex plastic camera kit. It's a shame that there are no equivalent US magazines like that of Gakken's Otona no kagaku (大人の科學) magazine. However, the US-based MAKE Magazine is now selling many Gakken kits online, including the stereo pinhole camera (next on the list?). The Otona no kagaku magazine (#25) has a wonderful-looking section on the history of photography and twin-lens reflex cameras. I wish I could read Japanese! For the relatively modest sum of $58, which included 2-day shipping, I had the kit in my hands in time for my birthday, as a present to myself. However, it wasn't until last weekend that I finally assembled the camera.

First of all, if you have assembled any plastic models in your spare time, you don't need to be able to read the instructions. While there were some places in the assembly that I had to think about before proceeding, the camera went together with relative ease, and I am impressed with fit and finish of the plastic parts. All you need in the way of tools is the small Phillips-screwdriver that is provided in the kit. Forceps are useful for holding small springs or screws in place, so you may want to get those out if you have them. There is a misprint in the instructions where the springs A and B are mislabeled, but if you look at the assembly diagram, you would realize that the functions of those springs are such that it's easy to figure out. (Here is the correction). Anyhow, I probably had the camera together and working in about 45 minutes. It's important to test the sub-assemblies before you screw everything together so that you know how things work. That's the beauty of building your own camera.

The lenses are geared to focus together, so what you see on the frosted plastic waist-level viewfinder should pretty much be what you get on film. The lenses extend far enough from the film plane that you can close-focus to about 18" from the camera. If you have some series 5 or 6 filter holders that are about 25 mm (viewing lens) - 27 mm (taking lens) in diameter, you can put diopters, neutral-density, and color filters in front of the lens.

I loaded a roll of Kodak Plus-X pan (ISO of 125) into the camera the next day, and shot a roll. Note -- the camera has a nominal aperture of f11 and a shutter speed of about 1/150 sec. On a sunny day, ISO 100 film should be just fine. Also note that it might be ambiguous in the instructions that you only need to advance the film 1/2 turn, not 1 full turn. That is why there are two index marks around the film advance knob. I did a full turn, just for safety's sake and after developing I realized that a 1/2 turn was all that was necessary.

Gakkenflex-1

Photos? Oooh, what dreamy goodness! After shooting only about a dozen shots on my first roll, I think I have a good idea of what to expect in the future. The lens is a single-element, so there is aberration and dreamy out-of-focus areas when you shoot close-up. Even for shots at infinity, the focus seems to have places where its sharp in the center and OOF around the edges. There is some vignetting close-up. The magazine has easily deciphered hints on modifying the camera, including making a square mask.

Gakkenflex-3

Expect more images from me later on , but I give this fun little camera a definite thumbs-up. There is a Flickr group, of course!

Sunday, January 03, 2010

Cheap Shots II - Recycled and Reloaded

It was almost three years ago that the Ann Arbor Area Crappy Camera Club (A3C3) held it first exhibition of members' images. In the spring of 2007, we had Cheap Shots at a gallery on the second floor of Nichols Arcade. It was a tremendous success, and we gained a bit of exposure because of it. Since then, we have had some smaller shows, though the one in the fall of 2008 at the Argus Building was certainly very much a large group effort. This year, we are showing Cheap Shots II - Recycled and Reloaded at the ReArt Gallery, located within the Recycle Reuse Center at 2420 South Industrial Road in Ann Arbor. It will run from Jan. 4-31, with the show reception being held on Jan. 9 from 2-4 pm.


The main emphasis for this show wasn't so much that of using "crappy cameras," but that of using cameras that were obtained second-hand, at thrift shops, reuse centers, flea markets, etc. to show that old film cameras are actually part of recycling and reusing. In addition, the frames, glass, and some of the mats are recycled, many obtained right from the Recycle Reuse Center.

Getting the light spot on Mike and John

I finally got all the cats herded, and Mike Myers and John Baird helped me hang the exhibit today, and it looks pretty darn good. There are 24 images from 11 photographers, and all of the prints are really pretty darn nice. A wide variety of imagery, and I think others will like it as well. Heck, maybe someone will even buy a print. I really like getting a show like this together, and once I had the pieces of work in hand or on the way, I felt pretty relaxed about it.

another wall...