Wednesday, July 19, 2023

The new, stylish Reflx Lab Light Meter

 Last month, I received a nice little package from Reflx Lab.  In it, was a sample of their new accessory light meter for me to evaluate.  Over the course of several weeks, I kept the meter on my black-bodied Pentax Spotmatic SP, and used it to shoot three rolls of film.  

In the past 4 years or so, a lot of small shoe-mounted light meters have come on the market.  In 2021 I reviewed the Doomo-D analog-style meter and in 2022, the tiny Cooldark V102 light meter.   

I love this little meter - it’s simple to use, and once you go to the Reflx Lab web site, you can find the instructions for the meter (a QR code is on the meter’s package).  Unlike some of the other tiny meters available, this one has a beautiful aluminum shell, not a rough 3D printed plastic body.  Aesthetically, it’s one of the sleekest and most unobtrusive shoe-mounted meters available. I like the easy to read LCD readout, and there’s not much fussing about involved to get a reading. Power-wise, it takes a CR1632 3v button cell, which came with my meter.  In use, I especially enjoyed the larger and easy to read display over those tiny OLED displays.  


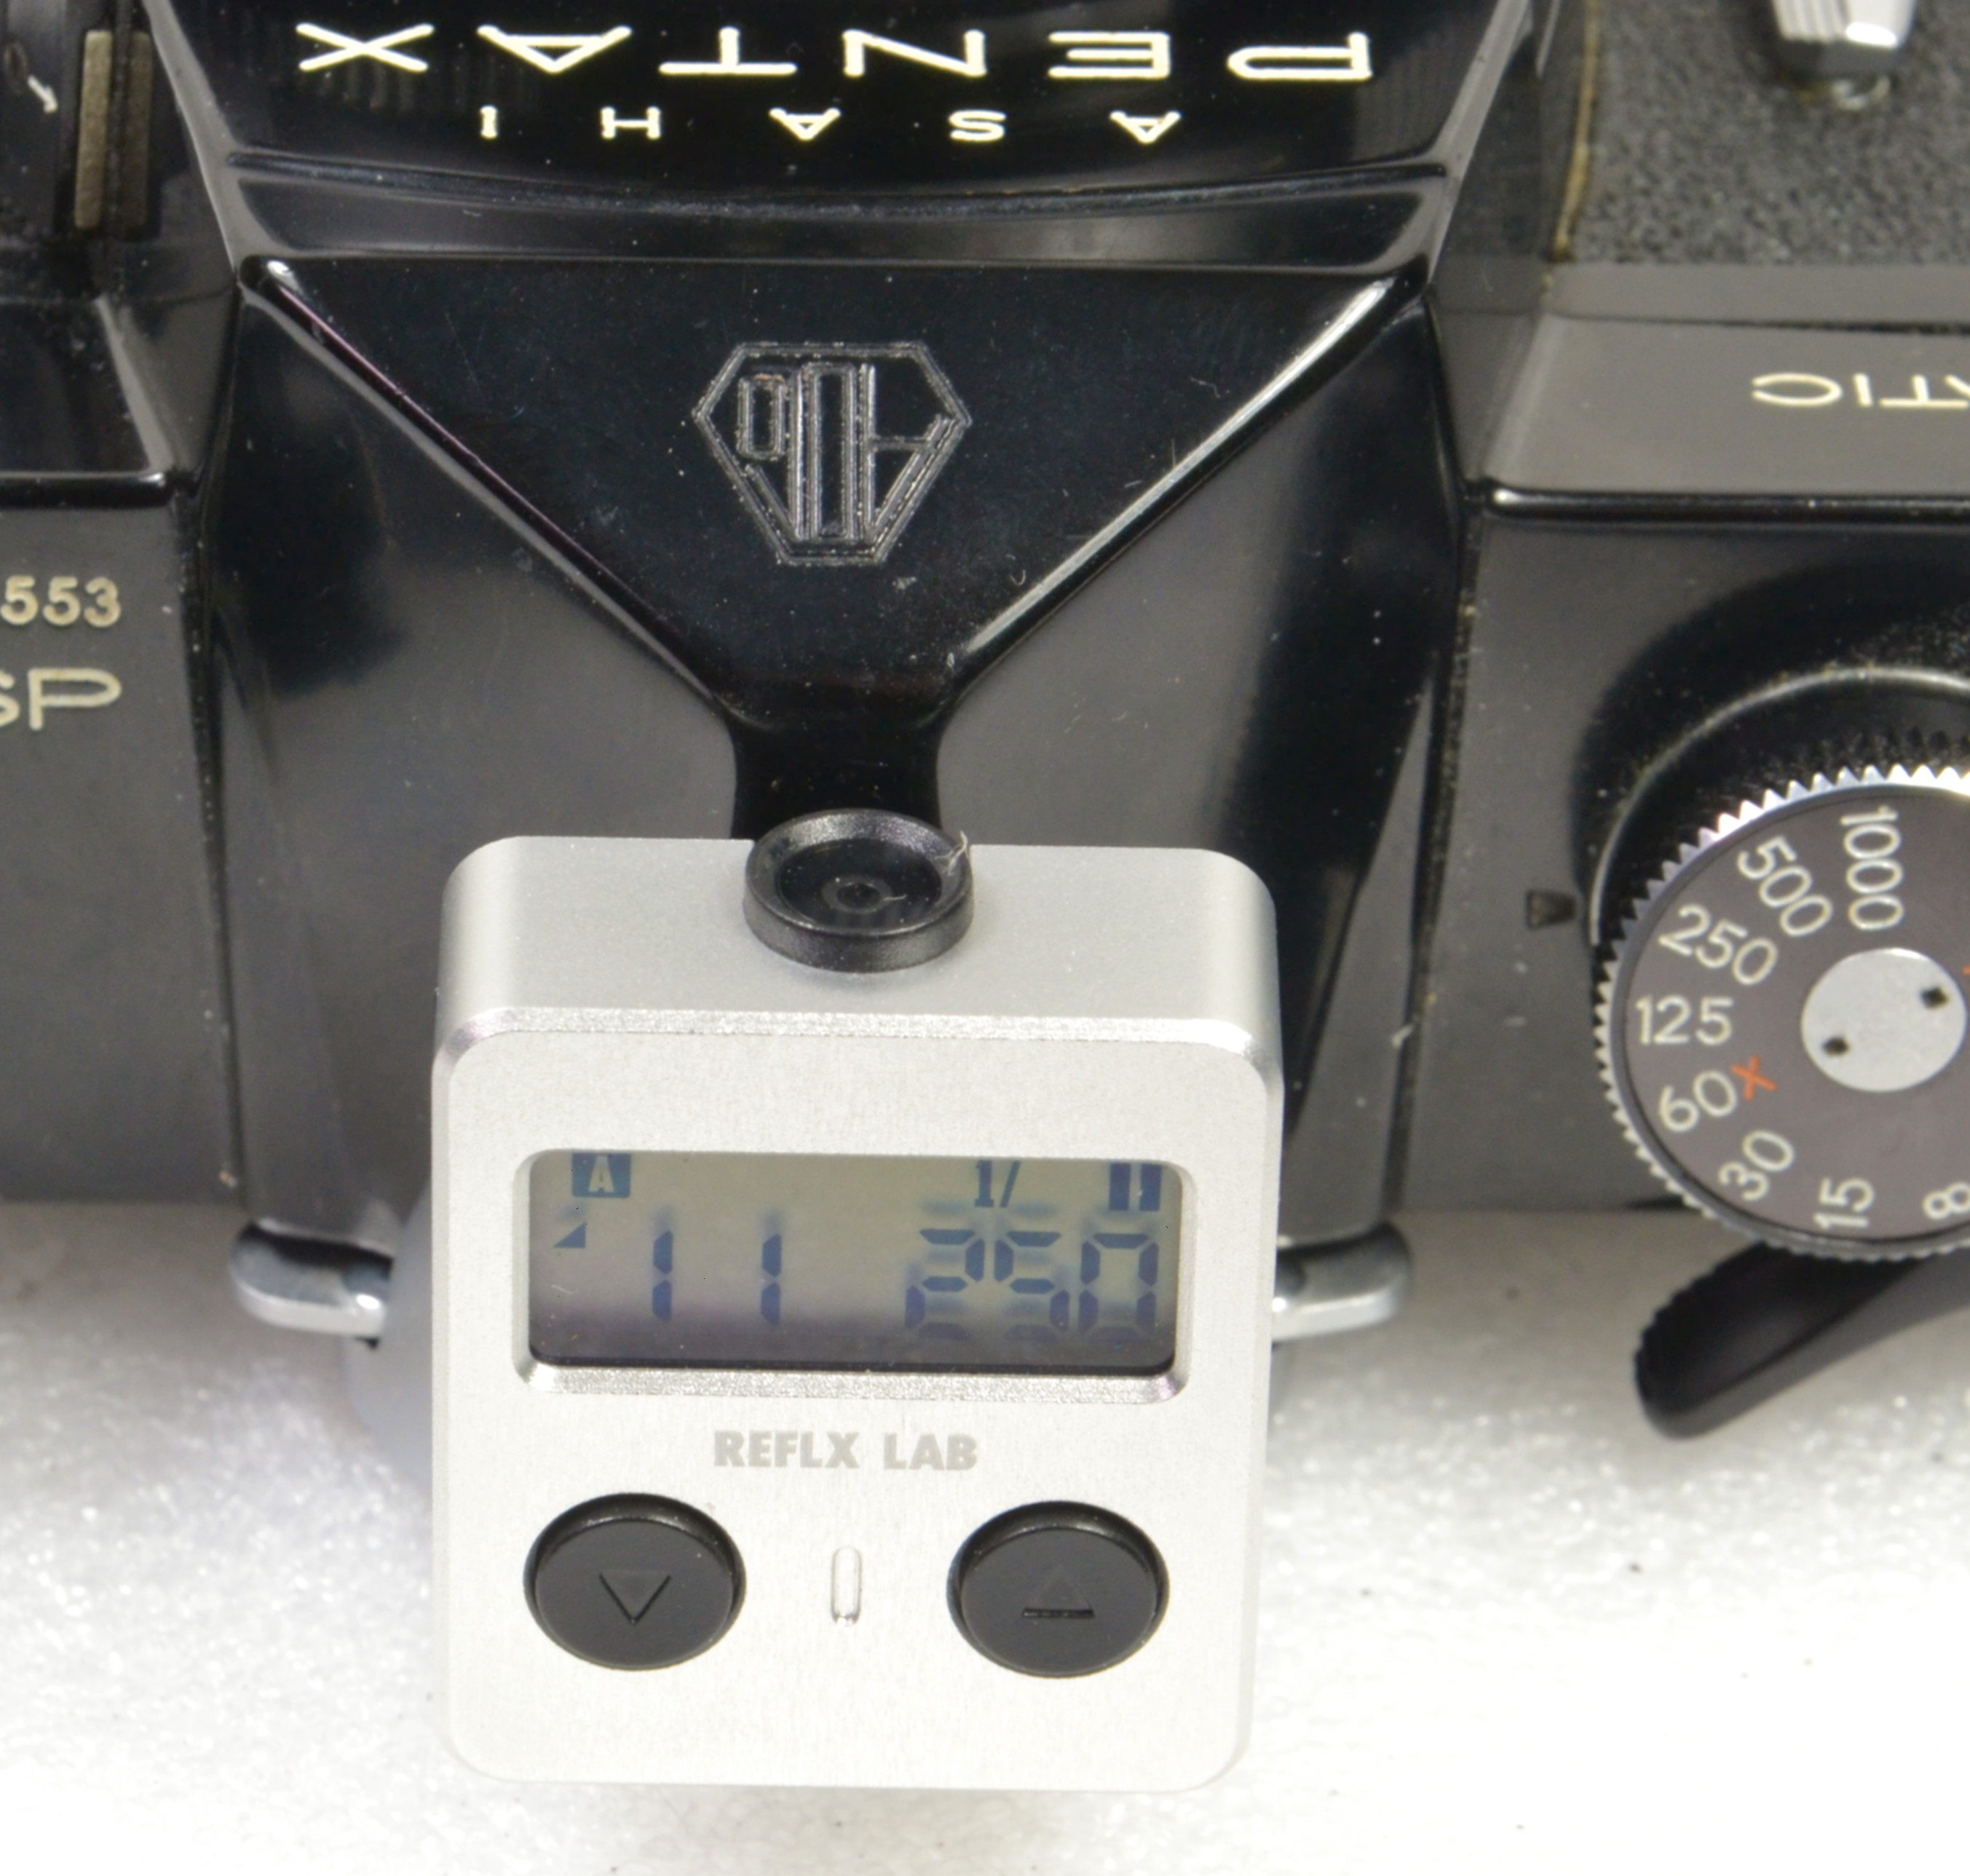
Is it accurate?  Yes.  It has a 30-degree angle of metering, and when shooting and comparing the reading with an in-camera light meter, it usually agreed.  The ISO setting range is 8-6400, which ought to be enough for 95% of the users.  Since I often use really low-ISO films, I’d love it if the meter went as low as ISO 1.   However, I can do the math and compensate when using extra-low ISO film. When I am out shooting with my Spotmatic, I’m often inclined to use the sunny-16 rule, and then check what I think it should be with what the Reflx Lab meter tells me.  Those really hazy days that we have been experiencing can fool the eye, and what might normally be an f/16 sunny day has become an f/11 or f/8 sunny day.  The meter reads out either in Aperture-Priority or Shutter-Priority, which I find perfect for my use.  It’s ease of use and performance, makes it a go-to accessory meter.  The other great thing about this meter is the price — as it sells for less than $50.   

The Reflx Lab Light Meter  is well-designed, accurate, easy-to-use, and inexpensive. All good things in my opinion.


Specifications:

  • Material: zinc, aluminum, & PC plastic
  • Color: Black or Silver
  • Metering Angle: 30-degree average metering
  • Shoe bracket position: left, center, or right (adjustable)
  • Dimensions: 35mm x 28mm x 11.5mm (1.4inch x 1.1inch x 0.45inch)
  • Weight: 25g (0.88oz)
  • Working Temperature: -12°C-60°C
  • Battery: CR1632 x1 (NOT INCLUDED)
  • ISO Range: 8-6400
  • Shutter Range: 30s-1/8000s
  • Aperture Range: 1-32
  • Exposure Compensation: -2 to +2

You can download the manual here: https://cdn.shopify.com/s/files/1/0608/4594/9094/files/REFLX_LAB_Light_Meter_User_Manual.pdf?v=1686927597


If you are looking for a small, easy to use light meter that fits into the hot/cold shoe on your camera, give this one a try.  Check my post on the Reflx Lab Pro Color 100 film to see the outcome with using this meter.


Monday, July 10, 2023

The Kodak C300R - camera and mini-printer


About a month ago, I finally purchased a Kodak Minishot 3, 2 in 1 Retro Instant Digital Camera and Photo Printer - hereafter known as the C300R.  I bought it on Amazon with 6 cartridges of “film” for $130.  The main reason for the purchase is that the C300R is not only a camera with an instant printer, but it also functions as a Bluetooth-connected printer for my iPhone.  What better way to share photos with friends and family?  Also, I find using it to add images to my journal is very helpful.  


Anyhow. now that I have had the C300R for a few weeks, I am impressed with the quality of the 3”x3” prints.  One could compare this to either a Polaroid mini or one of those zink (zero-ink) cameras/printers, but in terms of use - it’s certainly more like a little Polaroid camera. If you use it as a camera, it does not save an image to memory to be looked at later. The image stays in the buffer until you either print it, or take another shot. The print process is actually rather fun to watch as it’s a 4-pass process using a small dye-sublimation printer that does 3 passes for the CMY colors, and a final lamination layer that protects the surface of the print.  As you see in the short video, it takes about 60 seconds for that to happen, and you end up with a print that’s supposedly good for at least 100 years. 


The C300R isn’t exactly tiny, but it’s also not large. It’s 4” x 5” x 1.125” and can easily fit into a large pocket or your camera bag. It weighs about 14 ounces.  The tiny lens on the front has a selfie mirror nearby.  It’s use as an instant camera is pretty straightforward - just point and shoot, and press the print button on the back.  I didn’t expect the camera to produce jaw-dropping prints - but it really does a very good job with the prints - better than a Polaroid mini, for sure. Plus, you can add borders or effects to the image before you print it. A fun toy, for sure.

The "used" YMC panels 

As a portable printer for your phone, you just need to download the Kodak Photo Printer app, connect to the C300R via Bluetooth, and then you select the images that you want to print.  Sharing could not be easier.  Since the prints are square, the best option is to take images on your phone in square format - which is what I normally do, anyway. You can do some cropping, etc in the app if necessary. It’s really a lot of fun to watch this printer work, and as each layer - Yellow, Magenta, Cyan, and Lamination takes place, it shows on your phone and the small LCD screen on the camera what’s taking place.


A box has three cartridges of 10 shots each

Each pack of “film” is self-contained with the 10 sheets of paper and the roll of thin film with the sequence of dyes for each image. As they get used up, they get rolled onto a small cylinder in the cartridge. So in essence, you have a long series of yellow, magenta, cyan, and clear rectangles.  Each one has a component of the image that you printed.  I a bit of curiosity, I tool a used cartridge and unrolled the film from the take-up spool, and then tried to scan each of those layers separately to remake the image.  The thin film is really difficult to handle, and I also tried manually stacking the 3 color layers together and then photographed that, reversed the image in my image editor, and voila - a rather unsaturated and slightly misaligned image. Such a process could be something that has applications for people that are more creative than I am.  I did make a black and white image just from the Magenta layer, and it reminds me of the “negatives” from the peel-apart Land Camera film, FP3000B.

manually layering the 3 colors on a light table,
photographing it, then inverting to a positive.


Just scanning the Magenta layer and converting to monochrome!

The C300R has a built-in battery that’s charged by attaching a USB cable (Type B?) to any USB power source.  Each cassette holds materials for 10 shots/prints, and the cost per photo is about 60 cents - which is pretty cheap compared to a Polaroid or Instax camera.


Overall, I think it’s a great device for anyone that would like to have an “instant” camera or a tiny portable printer. I don’t know how durable the C300R is over time, but like any digital device, it shouldn’t be abused. For the price, it’s pretty good value, and the supplies are not expensive.  If you don’t need the camera function, Kodak sells just a mini-printer (P300R) for about $100.  Another option might be the Canon SELPHY QX-10 printer, which also uses dye-sub technology and prints 2.7” square, but it costs as much as the C300R.  I can't really compare these to the "zink" cameras and printers, as I have not used them, but dye-sub prints are supposed to last a lot longer than the zink images.

Any of these tiny printers are useful tools for journaling, sharing photos at gatherings, or just having a small, tangible object to give someone.  When I took a photo of two women with their dog at a local brewery and gave them the print (which the images above are based upon), they were thrilled with the gesture, and wanted to know more about the C300R. The color rendition with the C300R is very good, and the glossy print that results is so much like a small Polaroid, but better.  As I stated in my recent Monochrome Mania issue 10 - it's a good idea to print  and share those smart phone images, and a mini-printer such as the C300R is a great way to do it.


Saturday, July 08, 2023

One Roll Review - Reflx Lab Pro 100


I was in my local camera store and recently picked up a roll of Reflx Lab Pro 100 C-41 film.  I have previously shot with their 400 ISO C-41 film and it was early days for Reflx Lab at that time.  Now, with more experience, and more offerings, Reflx Lab is no longer some unknown little company based in China.  It’s obvious that their excellent packaging (love those aluminum canisters) and approach to offering what are normally ECN-2 films with the remjet removed, as well as other the films that they carry are reaching new customers.  Finding their films on the shelf at Ball Photo in Asheville was a pleasant surprise, and of course, I had to buy a few.  Full disclosure here - after I had purchased the film, about a week later I received a package in the mail from Reflx Lab with 3 rolls of the Pro 100 color film and a new light meter to review.  The light meter is still being evaluated, and I will have a review ready in another week or two.  So, this review is based on the film that I had already purchased.

What is Reflx Lab Pro 100?

Guess what?  It’s Kodak Aerocolor IV C-41 film.  Before testing the film, I had seen the images of the Reflx Lab 100 Daylight film, which is the Vision 3 5203 50D film.  My first thought was that the packaging had changed, but after development, it was obvious that it was the Aerocolor film because there is no information on the film rebate, and the sprocket holes are typical 35mm still sprocket holes. Side by side, with the Flic Film Elektra 100, it’s obvious that they are the same type of emulsion.  Better yet, the Pro 100 is available from my local photo store, and is reasonably priced at $11.99/roll.

Loaded into the Spotmatic SP - and look at that nice little
light meter from Reflx Labs 


I shot my first roll of the Pro 100 with my beautiful, black Pentax Spotmatic SP with an uncommon lens - the Vivitar 35-85mm f/2.8 zoom.  I chose colorful subjects, and the resulting negatives did not disappoint me.  The film was developed at Ball Photo, and I scanned it on my Epson V700 flatbed scanner.    Again, the resulting scans are wonderful, with the obvious excellent characteristics of the Aerocolor IV  providing vibrant images with low grain and excellent latitude.


What's not to like about the Reflx Lab Pro 100?  It's affordable, has excellent color rendition, it's a true C-41 film, and is available in my local store.  If you are looking for a good all-purpose medium speed color film, this is it.  See my previous post about the Aerocolor IV film for more information on it, and I am glad that Reflx Lab is packaging this excellent color film.   

Tuesday, July 04, 2023

One Roll Review - Elektra 100


One thing that’s really become apparent in the past few years is the rebranding of film stocks from various sellers. For example, you’ll find Fomapan 100 rebranded as no less than 8 different films.  In the color film world, it's generally been rebranding of Kodak ECN-2 films - some with the remjet removed, such as with Cinestill and Reflx Lab. However, some recent introductions have been a great surprise, and have introduced films that I did not previously know about.  Such is the case of Kodak’s Aerocolor IV, an aerial surveillance film that has a primary purpose in aerial mapping and photogrammetry applications, and the film’s low-grain, high color accuracy, and lack of an orange mask makes it a unique C-41 film that has been languishing in the shadows until very recently.


So, enter SantaColor 100, and Flic Film Elektra 100 - both of which are 35mm 36 exposure cassettes of the Aerocolor IV (NOT Aerochrome — that was a false-color IR film). Only the Flic Film tells us what the film actually is.  From what I have read, one can only buy the Aerocolor IV film in 5” x 500 ft lengths - which of course, is going to be quite pricey especially considering that one would likely have to have any film cut to 35mm and sprocketed afterwards.

From the Kodak Data Sheet (dated October 2009):

“KODAK AEROCOLOR IV Negative Film 2460 is a medium-speed, very fine-grain color negative aerial film. This film has a wide exposure latitude and is specifically designed for processing to a color negative only. Since this film does not have integral color masking, direct interpretation can be made from the negative. Objects are recorded in colors complementary to their natural colors.

The ESTAR Base provides flexibility, moisture resistance, high tear resistance, and excellent dimensional stability. KODAK AEROCOLOR IV Negative Film 2460 has an abrasion-resistant emulsion, an antihalation undercoat, and a dyed-gel backing.

The hardened emulsion permits high-temperature, rapid processing in roller-transport processors, such as the KODAK Aerial Color Processor, Model 1611, and the KODAK EKTACHROME RT Processor, Model 1811, with Quick-Change, using Process AN-6. This process consists of selected KODAK EA-5 Chemicals and AN-6 Chemicals. Processing can be easily tailored to optimize contrast for specific applications.

This film is also compatible with Process C-41. It can be processed in existing C-41 processors using either KODAK FLEXICOLOR Developer or KODAK Developer Replenisher, Process AN-6.”

Additionally, the film has an integral UV-absorbing layer so that UV filters are not needed.  However, since the film is on an Estar base, it should be loaded into the camera under dim conditions to avoid light-piping. 

Okay, what about the Elektra 100?

I bought my rolls from Ultrafine Online, one of my three favorite places to shop for film and developing chemistry.

The film comes in a black canister, so that it’s not going to be light-piping along the film base from the exposed leader.  Load the film into your camera indoors, if possible.  The ISO is set at 100 - leave it at 100 for the best results.  I loaded my film into my Nikon FM2N  and then went to Spruce Pine, NC for an afternoon of photography with my buddy, Graham Young.  Most of the time I used the 50mm f/2 Nikkor, though in a few instances, I used my 200mmm f/4 Nikkor to isolate a window scene.

I had the film developed at Ball Photo in Asheville, and scanned the negatives on my Epson V700 scanner.

I have to say, this is a fantastic film.  It has no curl, lies flat in the scanner, and the color rendition is excellent.  It’s supposed to be very low grain, and it certainly is.  There’s no orange mask, but the scanning was perfect.  Here are some samples from that roll.

mural, Haywood St, West Asheville

Tastee Diner, West Asheville

Spruce Pine, NC as are the rest that follow


It’s not an inexpensive film at 12.95/roll, but it’s also not as expensive as some other color emulsions.  At this price, and considering the quality of the images, I think it’s a bargain. I have another roll that I’m saving for some colorful subjects, and I now know what the film is capable of.  Kodak — you really ought to make this film available for 120 and 35mm cameras. 

For more information from Kodak:

Information on available sizes and minimum order quantities of this film is available on the web at www.kodak.com/go/aerial. You can also write or contact:

Aerial Imaging

Eastman Kodak Company

343 State Street Rochester,NewYork 14650-0505 aerial@kodak.com