Showing posts with label product review. Show all posts

Saturday, October 08, 2022

Reflx Lab 400D Film Review


A few months ago, I received a package from China with two rolls of film from Reflx Labs.  I’d seen their products on Instagram, and they offered to send me a couple of rolls  to try out. I hoped that I would have gotten this review done sooner, but now that I have developed the second roll, I think I can finally provide some observations on this film.


The Reflx 400Daylight is actually Eastman Vision 250D with the remjet layer removed.  I commend Reflx Labs for providing this information on their website.  There is only one company making ECN-2 film at this time, and it’s Eastman Kodak. While the film is being pushed 2/3 of a stop, the Eastman Vision 3  film has enough latitude to handle the modest push.  

I really like the screw-top aluminum canister that the film cassette is sold in.  That harkens back to the really good old days, and the aluminum canister reminds me of some 1960s Perutz film.  Inside the canister is the roll of film, a keychain ring, and a DX-code sticker to replace the one on the film cassette.  There is a small hole on the end of the spool to attach the keychain, which means you’ll need to ask the film lab to return the cassette if you wish to use it on the keychain.   There’s nothing second-rate about this cute little package, and I loaded up the first roll in my Nikon FE.   I shot that roll at the end of July, and had my local lab (Ball Photo) process the film as C-41.  The results were quite good, though at the time, I thought I was seeing some “light piping” going on.  There was a tiny bit at the beginning of the roll, but further camera testing revealed that I had a slight light-leak by the film door hinge. Argh!!

The second roll was loaded into my Nikon F3HP which does NOT have any light leaks. I shot that roll during my trip to Lexington, VA, and finally developed it with the new Film Photography Project ECN-2 kit.  Even though the remjet has been removed, the ECN-2 chemistry and temperatures are just a bit different from C-41, and are the recommended developer.  It also allowed me to compare colors with the first roll.

The only problems that I have seen with this film are the obvious light-piping early on in the roll, and after going through the images and editing, there are quite a few frames on the second roll that have black hair-like marks in the image.  Dust spots and hairs will show up as white in scans, but emulsion defects will be black.  It could be that these are caused by the remjet removal process, which is done prior to packaging.  They are easily cloned out in editing, but I'd rather not have to do that. This wasn't seen on the first roll, so maybe it's just a random occurrence.

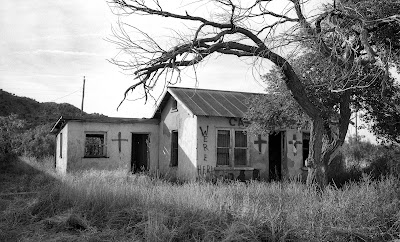
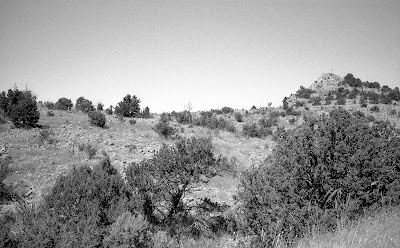
the arrow points to the black lines on the image


Not all were as bad as this - the arrows point to the black lines
on the image.  The next image shows the edited version.


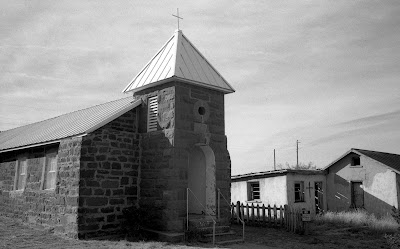
The lowest point on the Blue Ridge Parkway - over the James River in VA


I did not attempt to test the 400D in all types of situations, but shot it as I would any color film, and I think the images I got from the two rolls are very good in rendition - though there are a few times when there is some halation effect - an orange-ish halo around a "hot spot."

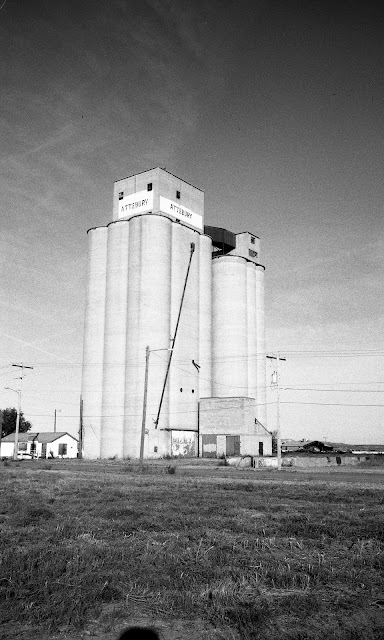
It should be no surprise that another seller has done what Cinestill has done. In the world of ECN-2 film stocks, Cinestill figured out a way to remove the remjet coating before packaging the film, so that the film could be processed as C-41.  In addition, Cinestill uprated the Vision 3 500T film to 800 ISO, about 2/3 of a stop.  I typically advise shooting the ECN-2 films at the box speed, but a 2/3 stop push isn’t a big deal.  The Reflx Lab 400D is similarly uprated, and the results show that the push isn’t a problem - at least in my experience. It looks good developed in C-41  as well as the native ECN-2.
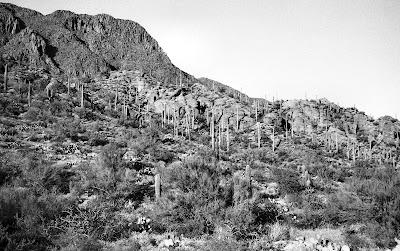
Images from Roll 1


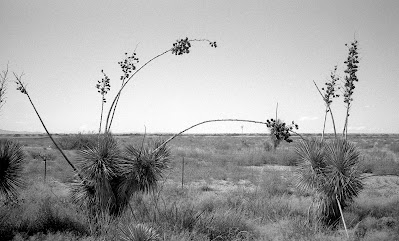
note the reddish halation from the bright spots


Images from Roll 2


ghostly sprite from the light piping

Conclusion - overall, I like this film - Vision 250D is an excellent daylight film - which I have always shot at box speed.  The Reflx Lab 400D may need some additional care by the company to avoid the light-piping along the frames and the abrasive marks that I see on roll 2.  As in any secondary sale of a film, there is always the chance that your results may vary if uses or treatment are different from the manufacturer's recommendations.

Wednesday, September 29, 2021

DOOMO D light meter review

The DOOMO D meter matches the lines and finish of a Leica M2

Lately, we have all seen a number of extremely-compact shoe-mountable light meters such as the one from Raveni Labs, and the KEKS EM01.  These little wonders use a small OLED screen to provide the exposure information, with tiny buttons to change settings, etc.  My biggest problem with these ultra-tiny meters is that the screens are sometimes difficult to read, and that they are small enough to well,... lose.  I have been using handheld meters such as the Gossen Pilot Selenium meters (which work quite well) and the Sekonic L-208 Twin-Mate, a modern, still-in-production light meter.  I originally wanted a Voigtlander VC Speed Meter II, but with a price at over $200, it was more than I wanted to pay.

DOOMO D meter

Now, I think I have found a favorite light meter for my Leica M2. It's the DOOMO Meter D, which at first glance looks a lot like the Voigtlander VC II.  First of all, it has exactly the layout I wanted - an analog dial approach, just as you would find on a camera, with +/- red LEDs and a green one for the "correct" exposure.  It sits in the accessory shoe on the Leica perfectly, and looks like it's part of the camera.  The dials are easy to move, and the LEDS are easy to see in bright light.  On top of that, it has a metal case that looks robust and well-finished, and a perfect match for any classic camera.  However, looks are not everything. It also has to work well, be easy to use, and I need to have confidence in its accuracy.  The DOOMO D meter does all those things. 


Upon receipt of the DOOMO D meter  from Cameractive (direct from China), I was pleased to see it well-packaged in a black box.  Now, I am a pretty experienced photographer and familiar with all sorts of gadgets. The only information in the box is a small card that has brief instructions on inserting a battery (CR-1632 coin cell that is not included) and QR codes to take you to the online manual. I had no trouble figuring the rest out without looking online. The package also includes two shoe mounts, screws, a small black stick-on circle, and a small screwdriver.  My only quibble is that while the slotted head screwdriver fits the Phillips-head screws, it should be replaced by an actual Phillips head screwdriver.  However, if you need to use the manual, the online manual has all you need. If you have used a camera with built-in light meter such as a Nikon FM, then the controls don't need much explanation.  You set your film's ISO on the left wheel, - which ranges from 25-6400, and that wheel also has your aperture settings (f/1- f/22), while the right wheel has the shutter speeds (1 sec - 1/2000).  If like me, you are an aperture priority person, I set my aperture and move the shutter speed dial until it the LED shows green, or +/- 1 stop, and then I set my shutter speed on the camera to match.  Now the funny thing is -- it's entirely possible to forget that you have to adjust the camera settings to match what the DOOMO light meter is at.  I had a brain fart like that a couple of times, forgetting to transfer the meter settings to the camera. That's not a meter problem, it's a human problem!


You can attach the shoe connector to either the right side or the center, and the screws hold it firmly in place to the body of the meter. For my Leica M2, the meter needs to hang to the left of the shoe, and the placement is absolutely perfect.  

online manual


Results. After shooting three rolls of film with the DOOMO D light meter, I feel very confident in its metering accuracy.  It's made me use my M2 more often, and at only a hair over 2 ounces in weight, it's not even noticeable as an add-on.  The metering is easy - press the black button on the rear to activate the meter, and adjust accordingly for your exposure.  The meter has a 30° angle of view for the sensing, and that seems to work quite well.  The advertised battery life is 60 hours of continuous use, and that's a lot of shooting.  I recommend having a spare, just in case. You can get a package of 10 CR-1632 3V cells on Amazon for less than $6. That's the price of one at the hardware store.

underside of meter. The battery compartment is
securely closed with a screw.


Overall, I found the DOOMO D light meter to be just what I wanted - simple, accurate, stylish, and well-made.  For me, it's a perfect fit for my Leica, and I highly recommend it if you want an analog-style meter.   It's available directly from Cameractive as well as Doomo and some eBay sellers.  Also, take a look at the Doomo Instagram account, as well.  At a price of $125, I think it's very affordable and probably the least expensive accessory for your Leica that you will ever find. I thank Zhang at Cameractive for contacting me and sending the meter to review.  

rear view of the DOOMO D meter


Some images from the M2 with Ultrafine Extreme 400 film, using the DOOMO D meter


More images from my October 2021 trip to the Southwest US.  The Leica and DOOMO D meter make a great pair.

Tucumcari, NM, FPP Frankenstein 200 film

Cuervo, NM, FPP Frankenstein 200 film  

Cuervo, NM, FPP Frankenstein 200 film

Lordsburg, NM, Fomapan 100

Gila National Forest, NM, Fomapan 100

Gates Pass Rd., Tucson, AZ,  Fomapan 100