Monday, December 28, 2015

It's the Holiday Season

Holiday Flash Brownie
Now that I can develop my own C-41, it's given me the chance to catch up on some larger roll-film developing, and this roll of Kodak Portra 160 that was respooled for 127 had been sitting on my shelf since after World Toy Camera Day (back in early October).   I shot it in a Kodak Brownie Holiday Flash, an unassuming little Bakelite camera that has been sitting on my shelf, as well. As far as 127 goes, it's a full-frame model, meaning that the negatives are ca. 4x6 cm, giving 8 shots per roll. This camera has a Dakon lens, so it was manufactured  between 1955 and 1963.
I didn't know what to expect from this little camera, but I took it out for a walk to peach Mountain Observatory near Dexter, MI, and it turns out that it may have given me the best images for WTCD that I've taken in a while.
It certainly qualifies as a toy camera, as there is only a shutter button for control.  That's as rudimentary as any box camera.  The Holiday Flash Brownie also has a glass cousin, a Christmas tree ornament that I bought about 5 years ago. It's one of
my favorite ornaments, and looks very much like the real thing.
So, I developed the roll of Portra today, and I was astonished at how good the negatives were.  I don't have any film holders for 127, so I simply used the area mask in my V700 scanner, laid the negs emulsion-side down, and covered them with a sheet of 8x10 glass to flatten them out.  I had to tweak the orientation a bit, but overall, the scans came out quite good.  Peach Mountain is mostly UM property, and there is a radio astronomy observatory, as well as a Lowbrow Astronomers Observatory with a 24" optical telescope, and an abandoned UM observatory. All make for some interesting images.  The sunny day and open shade did not thwart the Portra 160's latitude.  I can see why this film was used in school portrait cameras, which is where the bulk rolls of Portra 160 come from.

Here is a screen capture of the negatives, followed by some of the scans.


Friday, December 25, 2015

My First Foray into Home C-41 Developing!

I don't know about others, but even though I have been developing my own b&w film for many, many years, I hesitated about trying to develop C-41 or E-6 films at home.  Like so many things, it's the fear of the unknown and of course, fear of screwing it up. So many steps, and the temperatures... how can I even try this?  I suppose someone that has never developed b&w film might feel the same way before doing so, and consequently realizing it was actually fairly easy.

So, with some urging by my super pals, Leslie and Mike, I ordered a couple of Unicolor C-41  kits from the FPP store. For $19 a kit, it's a pretty cheap experiment, and it's only a 3-step process. The fun fact here is that the kits are manufactured in Dexter Michigan, by Photo Systems, Inc. I have driven past the place many times over the years without giving it a thought!
1-L C-41 kit from FPP

I opened the first kit and carefully read the directions.  All the chems are dry and need to be mixed to 1L final amounts.  I highly recommend doing this mixing AND the developing with proper PPO - gloves, lab coat or apron, and eye protection.  It's not that the stuff is dangerous, but you are mixing  chemicals, after all.  Make sure that you have 3 clean plastic 1L bottles for the Developer, Blix, and Stabilizer solutions. I suggest the brown plastic darkroom containers. Make sure each one is labeled properly as to the contents. You can even put a (1) for the Developer, a (2) for the Blix and a (3) for the Stabilizer, in case you are worried about not doing things in the right sequence.  The Blix is a combination bleach and fix, and is probably the most caustic of the things you will deal with.

Temperature -- I use a deep plastic tub with hot water in it to bring the final temps of the Developer and Blix to 102°F.  The pre-soak (1 minute) should also be around the same temp.  Having several dial-type thermometers is very useful for monitoring the temps.  When doing the developing, make sure you immerse the tank into the tub to maintain the developer temp.  After finishing the Blix step, wash the film in water that is between 95°F and 105°F.  The Stabilizer is room temp., and is the very last step.  From Leslie, I got the tip to use a microfiber cloth wetted with Stabilizer to wipe down the back of the film (NOT the emulsion side) to avoid spotting (added in edit -- THIS IS AFTER removing the film from the Stabilizer bath. I found I was getting spots on the film side upon drying).

After each step, pour the Developer, Blix and Stabilizer back into their respective containers for re-use. This is not a 1-shot process.  Each liter should be good for at least 10 rolls of film.

You will need to "burp" the Blix after each set of inversions, as it generates some gas during its part of the process.  I use Jobo tanks and reels, so the top plastic seal just needs to be loose after the inversion set.

My initial fears were quite unfounded, as my film came out very good.  My first roll was some long-expired Kodak HD 400, and the results were what one might expect from old film.  My second and third rolls were fresh Kodak 200, and the results were excellent.  So, I am now doing my owwn color developing.  E-6 is next, and the temperatures are not as high as C-41.

Some examples from my rolls (all scanned on Epson V700) :
Plattsburgh, NY - Kodak 200, Olympus Trip

Amenia, NY, expired Kodak HD400, Olympus Trip

Kodak, 200, Olympus Trip

Adirondacks, Kodak 200, Olympus Trip

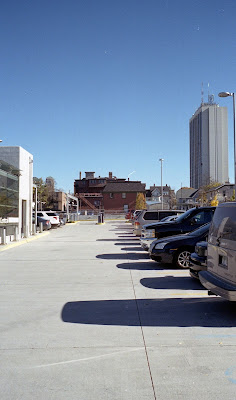
Ann Arbor, Kodak 200, Leica M2

Ann Arbor, Leica M2, Kodak 200


Wednesday, December 09, 2015

New Acquisition! The Classic Retina Automatic III

Last week I was downtown, checking out Antelope Antiques on Liberty.  The store usually has some cameras for sale, and every once in a while I find  something there that I buy.  The Kodak cameras I usually see are Ponies, ugly as sin Kodak 35s, and Brownies of some sort.  This time, I found a Kodak Retina Automatic III.  I have owned or handled a bunch of Retinas over the years, and still have a Retina IIa, a solid, wonderful 35mm camera.  The Retina Automatic III (1961-1963) features a 45mm f/2.8 Schneider Xenar lens, shutter-priority automation controlled by a Gossen selenium meter, as well as manual control. Shutter speeds are B, 1/30-1/500 sec. There is PC- flash sync, a cold shoe, and a pretty nice coupled rangefinder. The camera has lots of chrome, and is a typical late 1950s to early 60s build.  The film advance is on the bottom, making it quite easy to use.  I put a roll of Svema FN64 in it, and did some test shots around campus in A mode, to see what kind of automated exposure I was getting.  After I developed the film, it was clear that the metering is likely off, as the shots taken in full sun were badly overexposed.  I'll shoot another roll under full manual using an external meter and see how things turn out.
The camera is quite easy to use, and feels pretty good in the hands.  This particular example is in like-new condition, and I suspect being kept in the leather case all these years was one reason.  I doubt the original owner used it much, judging by the pristine condition.

A few examples from the test roll: