Saturday, November 27, 2021

FPP Frankenstein 200 Film!


For the past several years, the Film Photography Project Store has been introducing a monster-themed black and white film.  One of the reasons is that people love films with great packaging, and it certainly helps if the film itself can give good results.  Their line of "Monster Films" are hand-picked by Mike Raso to give consumers a taste of different films they might otherwise not consider.  The Dracula 64 is one of my favorite films with good contrast and fine grain.  Last year, the FPP introduced Wolfman 100 in both 35mm and 120, and this year, 2021, they came out with Frankenstein 200 in 35mm,  120, 620,AND 4x5. A big surprise was the release of Dracula 64 in 120, which I am quite excited about.

I'm not going to go and tell you what these films actually are -- that sort of spoils the fun - but if you are familiar with their line of film stocks, you can probably figure it out.  Besides, isn't it great when someone asks what you are shooting with and you can say "Frankenstein 200?"

Due to the wonderfully rendered monsters on each film label, I think that these films sell quite well, and the results from them are scary good. You don't have to save them for Halloween - any time of the year is good.  So, let's take a look at the latest Frankenstein 200.   

Frankenstein 200 is a medium speed panchromatic film that conveniently fills the gap between ISO 100 and 400.  In the color world, ISO 200 is a common ISO, but not so much in the monochrome world.  In older cameras that may not have 1/500 sec shutter speeds (and in the Hexar AF, a not so vintage camera, 1/250 sec is the max), Frankenstein 200 gives you a nice option.  It's a medium-grain film that has a traditional look to it, and it does well with the common D-76 developer.  Since it's also available in 120 and 4x5, that gives the larger format users something that's reasonably priced at ISO 200. 

Developer-wise you have a few options:

  • Kodak D76 - Stock Solution / 20°C/ 5-6 min
  • Kodak D76 - 1+1 / 20°C/ 8-9 min
  • FPP D96 - Stock solution / 20°C/ 7 min
  • Kodak HC-110 - Dilution B / 20°C/ 4 minutes or Dilution H (1+63) for 9 min
  • Kodak X-Tol - Stock solution /20°C/ 6 min

I shot two rolls - one with my Leica M2, and one in my Nikon FE2.  Each roll was shot on separate trips, and I thought my results were very good.  Both were developed in D-76 1:1 for 8.5 min.
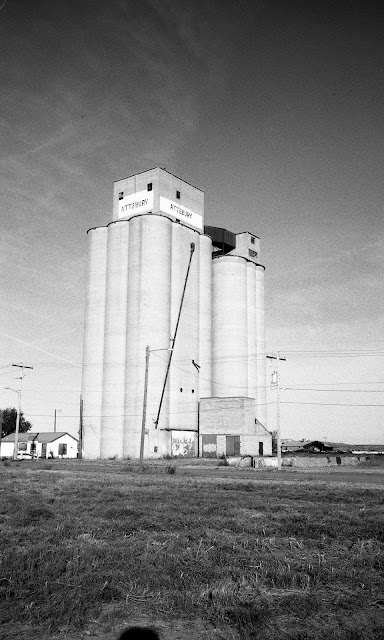
grain elevator, Tucumcari, NM
Leica M2 with 35 f/1.4 Summilux

Cuervo, NM ghost town
Leica M2 with 35 f/1.4 Summilux


Cuervo, NM ghost town
Leica M2 with 35 f/1.4 Summilux


Virginia Rest area, Nikon FE2

Glen Jean Bank, WV, Nikon FE2

Kent Square, Pittsburgh, PA, Nikon FE2

I really like this film, and you should give it a try.

I don't know what's in the works for next year, but I hope that Mummy 400 is under wraps until then. 

Friday, November 12, 2021

Olympus 35 DC - Auto Exposure Delight

Over the years, I have used/tested a lot of small 35mm Olympus cameras.  The Olympus 35 RC remains one of the favorites, precisely because of its size and manual control.  However, with automation, comes pitfalls - lack of precise control might turn you off.  Can you trust the camera to take a proper exposure all the time?  Enter the Olympus 35 DC.  I wonder if DC refers to "Distance Control" since it is a proper rangefinder camera, and beyond that, the camera does the rest. The 35 DC is the automated sibling of the 35 RD, a camera that commands pretty good prices.  You can find the manual online at the usual place - Mike Butkis.  However, the manual there refers to the later version of the 35 DC. My version is earlier, so the manual for it is located here.

Olympus 35 DC

First of all, the Olympus 35 DC features a wonderful 40mm f/1.7, and good luck finding a rangefinder camera of that size with such a lens (that would be the 35 RD).   The ISO settings range from 25-800, giving you some real choices for film types.  The shutter speed and aperture combination are shown in the viewfinder, so you do at least know what settings the camera is using for a scene, and there is a backlight compensation button at the rear of the camera for backlit scenes to add 1.5 stops of exposure.  The self-timer is located on the front, and there is a top-deck mounted dial for entering the flash Guide Number if you are using a flash.  The exposures range from 1/15 sec at f/1.7 to 1500 sec at f/16.  There is no B setting.


This is the earlier version - no battery check button near
the rear eyepiece.

also note the button on the far left - it releases the shutter lock 
while loading film in a dark area or with the lenscap on.

The 35 DC focuses from less than a meter, and the RF patch is quite visible and eassy to focus.   I have to say that this little camera feels good in the hands and is really easy to use.   Just focus, and press the shutter.  That makes it an ideal street camera, as the 40mm lens is a bit wider than 50, and it's very quiet.

Adjusting the ISO is accomplished by turning the black plastic ring on the barell - right next to the chrome ring.  You can only do this by setting the lens at its closest focus, so that you can grasp the black ring and rotate it.  The CdS photocell is located in the bezel around the lens, so you can use filters. The great news is that the 35 DC uses 49mm filters, which are not some oddball size.

Battery - I used a PX625A, which is 1.5 V.  The camera originally used the Mercury PX-625 1.3V cells.  You may need to ajust the ISO setting for the film to get an accurate exposure, or you can find a 1.3V zinc-air hearing aid battery to fit into the battery chamber.

I shot a couple of rolls with this camera, and my exposures came out fine.  You can see for yourself in the images below.  I can certainly recommend the Olympus 35DC as a great carry-around everywhere 35mm camera. The sturdy metal body will definitely make you appreciate the quality that went into making this camera.

Kodak Gold 200

Kodak Gold 200

Kodak Gold 200

Kodak Gold 200

Kodak Gold 200

Ilford Pan-F at ISO 32

Ilford Pan-F at ISO 32


Wednesday, November 10, 2021

Saguaros and the Catalina Mountains


Saguaros and the Catalinas, Holga 120N

One of the things about my trip to the Sonoran Desert is that we stayed in Tucson for a week, and our rental cottage was less than 2 miles from Saguaro National Park East (SNPE).  We were also fairly close to the Sabino Canyon Recreation Area - as well as the road that takes you to Mt. Lemmon.  What a fantastic location to be staying at for that length of time.  

When I was packing for this trip, I almost didn't bring a Holga.  Then I thought about it some more and decided that I'd find a filter ring and use a yellow filter for the b&w shots.  For most of the trip, we had clear skies with nary a hint of clouds, but our final day there, we had beautiful cirrus clouds that added so much to the stark landscape.  Typically, a cloudless sky has very little drama - a gray featureless backdrop to landscapes or buildings.  In color, you have those azure skies that go on forever, but even then, some clouds add something.  

The day I took this was our last day in Tucson, October 16.  We drove out to Sabino Canyon Recreation Area and hiked a section of the trail that goes through some of the most beautiful Saguaro cactus "groves" that I have seen.  On top of that, the Catalina Mountains add a great background.  The day before, we had driven up the Mt. Lemmon Highway, and viewed some wonderful landscapes, as well as looked back and saw the entirety of the bowl that Tucson lies in - ringed by mountains in all directions.  

I think this shot of the Saguaros from the Sabino Canyon Rec. Area was the best one taken with my Holga 120N.  I used Arista 400 film and a yellow filter held in place with a Series VI adapter ring.  It was also the last roll of film that I scanned from this trip - 36 rolls, mostly 35mm.  


Saguaro friends, SNPE, 10/10, Holga 120N, Fomapan 400, yellow filter.

The image above was also taken with the Holga on our first full day in Tucson on Oct. 10.  The  SNPE is full of opportunities to explore these cactus forests at your own leisure. No clouds in the sky that day.

Wednesday, November 03, 2021

KONO! Delight Art Film Review

Kono! Delight Art Film in 120 (from Kono)

KONO Manufaktur is a Germany-based company that reimagines current film stocks - or "upgrades" them according to their literature.  Typically, they have sold various 35mm color emulsions that are tinted in some way by pre-flashing them to create different color streaks and wash effects.  They call this "reanimated film".  The various 35mm color emulsions are certainly attractive for people wanting to try something a bit more esoteric. Each of the brands - Monsoon, Moonstruck, Sunstroke, Galaxy, Mirage, and Candy evoke different moods with the color palettes and effects that Kono has implemented with their "reanimation."  However, the Delight Art film is something a bit different, and is sold in 35mm and 120 rolls.


Earlier this year, I was given a roll of the Kono! Delight Art film in 120, and I finally had the chance to use it somewhere special when I was visiting Tucson, Arizona in October.  I really didn't know what to expect, but upon opening the package I could see that it was Kodak Ektar 100 with a Kono sticker on it.  I loaded my Yashicamat 124 with the roll and shot it.  I sent it to The Darkroom to be developed, and a within a week, I had my film back.  After scanning the negatives on my Epson V700 scanner, I was able to really see how the film differed from standard Ektar 100.  The images look like a warming filter was placed over the lens, as the effect tamed the bluish tendencies of Ektar 100, and colors were more yellow and warmer.  That's not a bad thing, given where and what I was shooting. However, given that the cost of a roll of the Kono Delight Art film in 120 is $25.00 and the cost of a roll of Ektar 100 is 9.70 (in a 5-roll pack), I think that if you just attach an 81A warming filter over the lens, or an 85B for a more pronounced effect, you'll get similar results and save yourself some money.

The altered colors of the Kono films are not for everyone and every situation.  Some people like the effects and others see them as gimmicky.  They do offer something different to try out, and go for it if you are so inclined.  However, the Delight Art film is priced such that you may as well experiment with color filters on regular Ektar (or any other color film) and se where that takes you.

Here are a few images from the roll that I shot in Tucson.  The effect was a good choice for the scenes there.

There's a lot of stucco/adobe in the SW, and you can find
a pleasing composition in just a doorway.

I love the way this cactus becomes the focal point

The yellow tint is more obvious with a white object

In plain Ektar, this sky would be really blue.


definitely warm