
Thursday, March 29, 2012

The Holga 135 Pan - A Quick Review

I have flirted with taking panoramic images for a long while. First there are the faux-panoramic shots - a mere crop of a 35mm negative so that only the center 18mm is used. Some toy cameras such as the Ansco Pix Panorama work that way, as shown below. Cherry Bowl

Then, I ran 35mm in a normal Holga using a special back and mask (reviewed here). It was basically a 24 x 58mm negative, and required one to open the camera in the dark to rewind the film into the cassette. Workable, but not the best solution. In the beginning of 2012, I saw an announcement somewhere for the new Holga 135 Pan camera, which takes standard 35mm film, and gives you a 24 x 72mm negative. I finally purchased one from Holga Direct in Hong Kong, and with shipping, I paid about $100. The camera arrived about 2 weeks after I placed my order, and last Saturday, I finally took the camera out to give it a test.

The features of the Holga 135Pan:
The camera comes with 2 lenses - a 55mm f/8 lens, and a pinhole lens with a f/236 aperture. The fact that one can remove the lenses tells me that people will be experimenting with this, which ought to be fun. I would not be surprised to see a wide-angle lens produced. The lenses have the typical Holga zone-focus icons. There is also a hot-shoe for flash, a wide-angle viewfinder that approximates the FOV of the lens. The shutter button has a socket for a standard threaded cable release. The toothed film advance is easy to use, and there is a film counter. You can shoot double exposures, so be sure to advance the film after each shot, unless you WANT multiple exposures. The shutter speed is approximately 1/100 sec. There is also Bulb mode for long exposures.
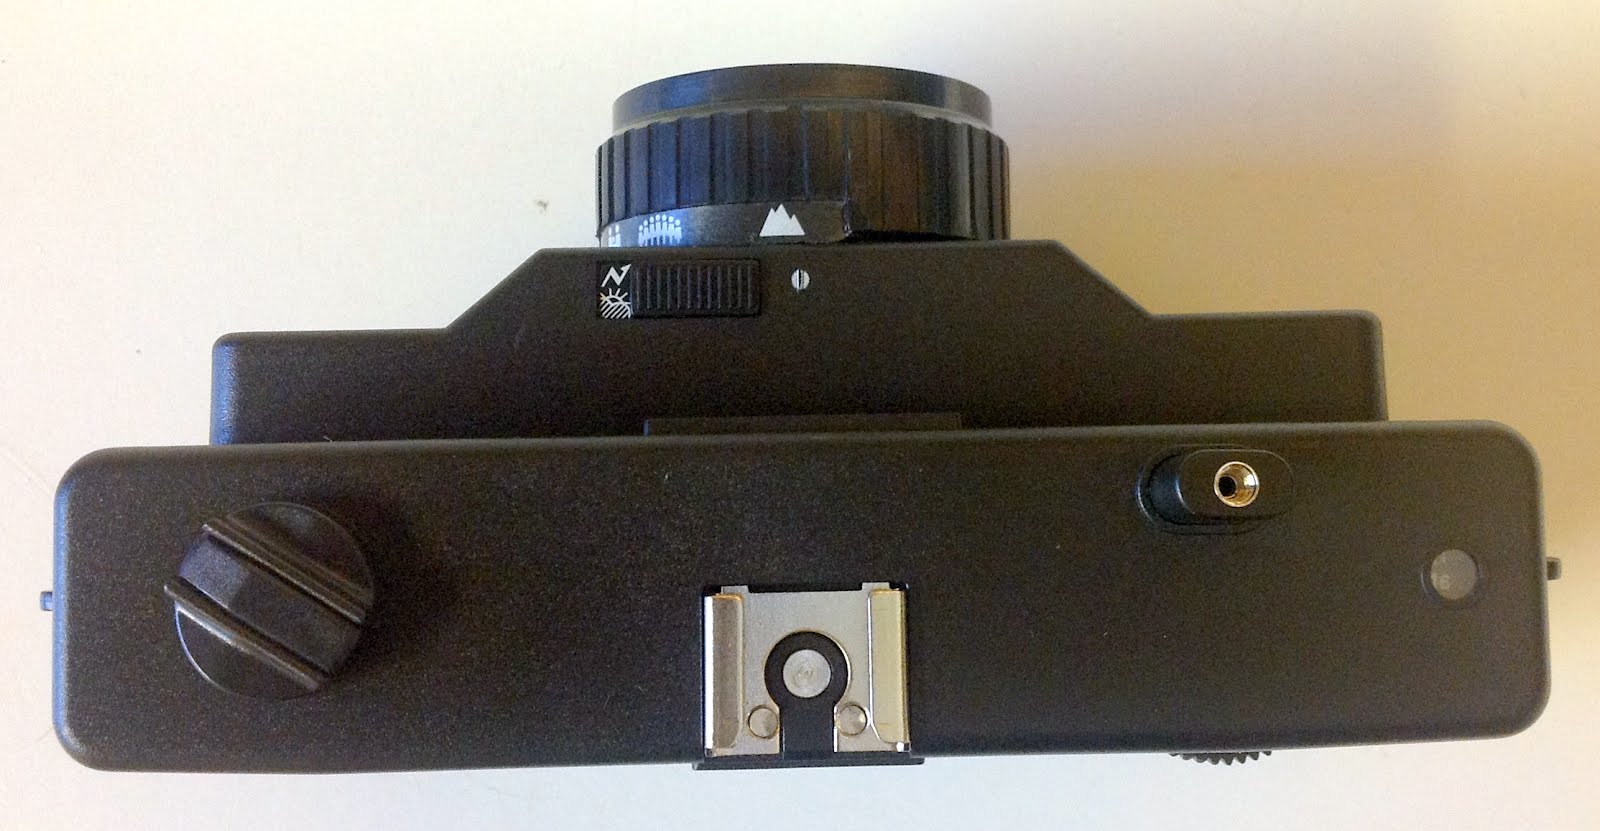


The instructions say to use 400 ISO film. Given the shutter speed, I think one could safely shoot ISO 100 or 200 on a nice bright sunny day. I used a roll of Kentmere 400 b&w film for my test roll. Since this is a panoramic camera, it is probably a good idea to use it on a tripod and make sure the camera is level. However, it IS a Holga, so I imagine people will want to shoot it all sorts of ways. If you use the pinhole lens (which I have not yet tried out), you will definitely want to use a tripod and cable release. The back of the camera has suggested pinhole exposure times, using ISO 400 film. That's a handy feature.

My First Impressions:
The Holga 135Pan isn't a Hasselblad X-Pan, nor did I expect it to be. It's a Holga, so you should expect lens aberration, flare, soft-focus, and vignetting with the 55mm lens. The camera is as simple to use as the Holga 135BC, or any other simple camera. I think it's actually pretty well made -- certainly sturdy enough for typical use. Once I got used to the feel of the camera, I found it to be smooth in operation. However -- make sure that you don't have the shutter set to "B" when you want the normal shutter speed, and remember to check your focus ring. The B setting is easy to do if you are not careful. Now that I have shot and processed one roll, I am pleased with the results thus so far. Shooting a panoramic image doesn't work for every subject or situation, but I expect that once anyone shoots a few rolls with this camera, that will become clear.

First, my sheet of negatives...

A few double-exposures, some overexposures, and a non-exposure. See, I am not perfect. :)

However, I have to say, that for a trial run on a cloudy and misty day, the results were not bad for a Holga. I scanned the negatives in on my Epson flat-bed scanner at 2400 dpi.

Mill in the Mist

Pleasant Lake Road

I am especially pleased with these two images. Getting the framing exact will take some time as I get used to the camera. Getting some pinhole photographs will be the next step. The beauty of this camera is that you can shoot pinhole or normal, just by changing the lens, which merely screws on. I imagine the price might turn off a few people, but seriously, who else is currently making a camera like this? It's a small market, and kudos to the Holga folks for producing the Holga 135Pan.

ADDITIONS From April 7... looking downriver
Looking down the St. Clair River in Port Huron, film is Fuji Superia 200.

You can also go Vertical with a panorama... This is a Marshall Fredericks sculpture in Port Huron.

Day

Monday, March 12, 2012

Lake Michigan Dunescapes Part 1.

On February 26, I drove across the state to Berrien County, which lies near the S end of Lake Michigan. My fellow photographer, Abby Alvarez, accompanied me and we had a great time exploring Warren Dunes and Grand Mere State Parks. I really didn't know what to expect to find, as it's been years since I have been to Warren Dunes, and it was always during the summer when I visited. Winter has been fleeting, but to my amazement, the dunes had some wonderful textures created by layers of snow and sand. It made walking up one of the large dunes quite easy, as the sand was semi-frozen. In addition, there was a really stiff, cold wind blowing up from the face of the dune, which I think I could have flown into if I had been wearing one of those wing suits (and gotten a face full of sand...).

I had decided ahead of time that I was going to shoot some of my remaining Kodak Technical Pan film. I brought my Nikon F3HP annd several lenses for the b&w shots, and my trusty Pentax ME with color film for everything else. I put a polarizer on the 24mm lens I was using for most of the dune shots, and right away, was looking at nearly a 2-stop light reduction. TechPan is rated at ISO 25, meaning that if I decided to shoot at small apertures, longish exposures were going to be the rule. I used my Bogen tripod, and for the most part, my results were pretty good, although on close inspection of the negatives, I could see that the stiff wind definitely had an effect on a few shots. Next time, I'll bring the really heavy-duty tripod.

Warren Dunes State Park encompasses about 1900 acres of land, and has campsites, and of course, a huge beach area. It is usually swarming with people in the summer months, and the campsites are almost always filled. The largest dune is over 200 feet above Lake Michigan. Going there in the winter provides one with a much different experience. We saw just a few cars in the parking lot, and watched with great amusement as a family was sledding down one of the few spots with snow on their plastic sleds. The combination of sand-covered snow and frozen dunes, ghost trees that had been uncovered by the dunes, as well as the winter forms of living trees, gave the main dune a very stark, post-apocalyptic appearance. Warren Dunes No. 2
Shot with the Pentax.

I developed the TechPan film in Technidol LC developer. I have enough of that to shoot about 10 rolls of TechPan, so it looks like I will run out of film and developer at the same time. Warren Dunes No. 3
Looking up towards the big dune from just above the parking lot.

Warren Dunes No. 5
I really liked the ghost trees towards the top. These are trees that were once buried by the dune, and then uncovered as the sand blew elsewhere.

Warren Dunes No. 6
The patterns in the sand were amazing. In the summer, blowing sand covers everything. This looks like an aerial photograph taken from about 60 miles up.

The polarizer really made the scenes "pop." However, I also noticed a bit of vignetting from the filter. Next time, I will use the 62mm filter on that 52mm lens.

I'll post more images in Part 2, as well as shots from nearby Grand Mere State Park.

Monday, February 27, 2012

The Yashica Lynx 5000

No, that's not the name of a NASCAR race. Yashica is well-known for its plethora of 35mm rangefinder cameras in the 1960s and 70s. These metal-bodied cameras usually have 45-50mm lenses and plenty of glass -- usually a minimum of f/1.8. There are a bewildering variety of models, starting with the Minister, Lynx, and of course, the series of Electro 35 cameras. The Electro 35 models tend to be somewhat larger and heavier than the Lynx models. Some take odd-sized mercury cells, and others take alkaline cells. Some are semi-automatic, depending on a working battery to operate, and others, such as the Lynx, can operate independent of a battery. With these aging cameras, it's often a matter of luck in finding one that works properly. In my case, I was at a local consignment shop and saw the Lynx 500e. It was in a case, and though it appeared to be in good shape, the batteries in the battery compartment had badly oxidized. However, the shutter speeds and apertures appeared to be good, so I paid the $40 for it.

Once I got it home, I cleaned it up a bit. I cleaned out the battery compartment. The camera takes two PX-640a cells, which can be found online or at a battery store. I decided to not spend any money on the cells until after I could test the electronics. I haven't done that yet, as the camera works great manually. The model I have is the Lynx 5000e, which was made between 1963 and 1966. It features a 45mm f/1.8 lens -- plenty fast enough for a rangefinder camera, and a shutter speed range from B to 1/1000 sec. That's an excellent range for a leaf-shuttered camera. The Lynx 5000 takes 46mm screw-on filters, and it just so happens that I have a bunch. There is no hot-shoe, but it does have a pc flash connector on the front. In the test shots that follow, I used my intuition for the exposure, and am quite pleased with the results on Kentmere 400 film. Although not too arty, the images do show the lens is sharp and focused correctly.

I really like the size and handling of the Lynx 5000e. One nice feature is that if one sets a particular shutter speed and aperture combination for a given exposure value, the rings can rotate together to give you a series of combinations of aperture and shutter speed based on the same EV. I find that to be a very useful option, especially on a manual camera. I'll give the camera a whirl with color film soon and see how things go. I certainly recommend the Lynx 5000, and if you look around, be aware that there is a Lynx 14 -- boasting the fastest lens on a compact leaf-shutter camera -- a 45mm f/1.4 Yashinon.

Sunday, February 19, 2012

Got film, comrade?

Earlier this year, I received a small package from my Flickr contact, Larry Dressler. Larry's into trying out all sorts of odd b&w films, and he had sent me a few rolls of Kodak Varicath microfilm to try out. Also in the package was a roll of Svema film. It was Svema 65, which expired the year I graduated from High School -- 1975! I figured that I might as well give it a try, seeing as how I have shot so many rolls of other long-expired films. Larry suggested shooting it at an ISO rating of 25, which made sense seeing as how old it was. I decided that the best choice of a camera to shoot it with than my Soviet-era Fed 5 rangefinder!

Heroes of the Revolution. Well, one of them is. That is a small pin honoring Yuri Gagarin next to the film box.

If you have never seen a roll of 35mm Svema film before, it's a best to make sure that you DO NOT open the box in daylight and most importantly, do not open the foil package unless you are in the darkroom or using a changing bag. The film is not in a canister! You need to load the film into a 35mm cassette to use it. Either the Svema folks were incredibly "green" in making you reuse 35mm cassettes, or they were incredibly cheap.


Check out the expiration date!

I shot some of the film at Toledo at the Toledo Art Museum, and about a month later finished it up at Parker Mill park off Geddes Road. After looking up some information on the web, I decided to develop the Svema film in Rodinal at 1:25 for 6.5 minutes.

Results

The film's information on the rebate developed normally, and there is a lot of base fog. Shooting at an ISO of 30 was actually way off. I should have tried shooting at an ISO of about 10! The film's sensitivity was way down, and the negatives that I scanned were mostly quite faint. Some time exposures that I guesstimated were actually pretty good (probably 8 seconds at f/11). The shots from Toledo were quite faint, but scanning them in worked pretty well. Without further ado, here are some samples...

It was fun trying a film that had withstood the latter part of the cold war, Perestroika, and the fall of the USSR. The Svema factory was located in the Ukraine, but it became a victim of opening up to the West. Kodak and Fuji films became available and the factory closed by the turn of the century.

Sunday, February 05, 2012

Working A Scene

Some questions I hear from aspiring photographers are: "What should I photograph?" "I don't know what to shoot, what should I do?" and "How is a snap shot different from what somebody who's famous shot?"

I think I can answer all three of those questions with one sentence -- "work a scene." What do I mean by that? Well, working a scene is something a good photographer does almost without thinking about it, but in reality, it means setting up a series of shots at a particular place to get a range of images. Taken in their entirety, the shots may provide a lot of information about the scene, but each individual image provides a singular interpretation of the scene. In fact, each image could be shot so differently that anyone seeing a series of prints later on, may not even know they are from the same place and time. Working a scene means getting a number of images from a place, and each image may bear a serial relationship to the other taken before and after, or not. But it's not a single photo of something that "looked cool." Thanks to the digital cameras that we have today, one can "work a scene" almost to death, experimenting with different effects, lenses, saturation, etc., and see the results immediately on the LCD screen. That's not a bad thing, as I think one benefit of digital photography is that it allows for exploration with immediate feedback as to what's working. You can work a scene with film, too. If you are serious about photography, working a scene is done almost unconsciously. However you photograph, no matter with film or digital, it pays to explore a scene and sometimes you will end up with images that you had not expected to take.

This morning, I anticipated that we would have some hoarfrost, so I grabbed my camera backpack with my Nikon D90 and lenses, and headed out to my vehicle (I always keep my tripod on the rear floor in my Escape), and drove off to Buhr Park. It's not far from my house, and I got there barely ahead of the sunrise. I decided to use just the 85mm 1.8 AF-D Nikkor with the extra-long lens hood, as I wanted to shoot wide-open for some shots. I have photographed the grove of apple trees in Buhr Park numerous times -- usually in fog, so I wanted some higher contrast scenes this morning and with the frost on the grass and the dark trees, I knew I would have some good opportunities for that(we have barely had any snow this winter!).

First of all, it's difficult to shoot into the sun, and you will get flare spots on your lens if you do. However, with a scene so obviously monochromatic, the colorful flare spots gave the image an entirely different look. I suspect that the 85mm 1.8 Nikkor is more flare-prone, too.
frosty sunrise 3

Shooting with the sun to the side and incorporating shadows from the raking light gives an altogether different interpretation of the scene. I also changed the image in PP to monochrome.
frosty sunrise 5

Opening up the lens to f/1.8 will give an image the appearance of more depth - while shooting at f/16 will give more depth-of-field, it does not necessarily equal the appearance of greater depth. A narrow band of focus does that.
frosty sunrise 1

Stopping down a bit to f/3.2, I wanted to use the sunlit side of the trees and the frosted grass. Just enough blur of the trees in the far background make the foreground pop more.
frosty sunrise 4

Lastly, a little PP work to give the scene a more Holga-like appearance.
frosty sunrise 2

It's obvious by now that all of these images are from the same place, but each of them has a differently quality and interpretation. That's working a scene (and working the brain). You will improve your photography by shooting a lot -- that's the only way to do so.