Sunday, March 30, 2025

Ilfocolor Rapid Half-Frame camera


I thought that I had sworn off single-use cameras, but a few months ago, I purchased three Ilford Ilfocolor Rapid Half Frame single-use cameras from Reformed Film Lab for $7 each. I probably should have gone with the special price of $6 each if I had purchased 10.  I’ve always had a sort of love-hate relationship with half frame 35mm. I loved the compactness of the cameras, but churning through a roll of film took some time, and the vertical format wasn’t exactly a favorite.  However, I figured that the price was too good to pass up, and I could always wind the film into the cassette in the darkroom and use the film in another camera should I want to.  


First of all, at this price, it was too good to pass up, and I opened the package to get a look at the camera — it looks pretty much like any other single-use camera, but with a viewfinder that matches the half-frame aspect.  A 27-exposure roll of film becomes 54 half-frames.  Certainly enough to evaluate the camera.  The camera has a built-in flash, activated by a switch on the front.  The film is stated to be 400 ISO color, and I have no idea what emulsion it is supposed to be, but it looks a lot like Kodak Gold 400.  It is NOT the same film that’s labeled as Ilfocolor 400 Plus Vintage Tone, which I will review separately. In addition, the only color film that Ilford/Harman is currently making is the Phoenix 200. So, these cameras are using some other outsourced film. They are made in China, not the EU. While the film is "expired" in 02/2025, it should be good for a few years more.

Over the course of a couple of months, I shot the roll and took it to Ball Photo in Asheville to be developed.  After scanning the film myself, I have to say that I am pleased with the results from this camera.  For one using this camera, like any other single -use camera, is easy. There’s no focusing, just point and shoot.  To be fair, I picked subjects that I thought would work well with the film format and exposure latitude of 400 ISO color film.  I used the flash only a couple of times, and you definitely need to be within 8 feet of the subject.

Here are some examples from the first roll, all scanned on my Epson V700 scanner:


Some of the images with clear blue skies had yellow streaks
in the sky as shown in the enlargement below.


I don't know if this is an emulsion defect, or x-rays or development. But it did not appear on other rolls that I had processed.  It did not go through any airport scanners, but maybe the shipment from China did? A curious thing.


I sent one of the cameras to my daughter, and I cannibalized the other one for the roll of color film inside.  Note - you need to wind the film into the cassette before you open the camera.  You can do this by taping over the lens with black tape and shooting the roll, and it winds into the cassette with each exposure, or in this case, unexposure!   Then, you crack open the camera to retrieve the cassette. If you have wound the film all the way into the cassette, a leader retriever will get the end of the film out.

Now that I see the results from this camera, I’ll have to see if Reformed Film lab has any left to sell. While I’m not ready to plunk down $500 for the Pentax 17, this Ilfocolor camera will give you a good idea what to expect with half-frame cameras.   I know that Kodak has a simple half-frame plastic camera, but their H35N sells for between $45 and $60, a far cry from the $7 I spent, and I would expect similar results from the Kodak.  The Kodak H35N does have a bulb mode and a coated glass lens, but I have yet to try one out.  If anything, the Ilford Rapid Half-Frame is a good introduction to the world of half-frame 35mm, and I highly recommend it if you can find one.  I ordered 10 more of them from Reformed Film Lab on 3/30/25, so they are still available.


Tuesday, March 25, 2025

The Balda Jubilette - A 35mm folding camera


Folding cameras, no matter what format, are an interesting concept. From the early bellows-style cameras that took film plates to the Polaroid Land cameras and the SX-70, the idea of making a camera more compact and easier to carry has a long history.  Not only are you unfolding a camera, you are changing its dimensions to accommodate a lens of a particular focal length, hence the bellows. A No. 4 Folding Kodet Kodak camera from 1894 has a bellows that extends from a box-like rear.  There is not too much involved in extending the bellows on the camera.  Later, the No. 3A Special in 1914 used roll film and the bellows is extended from a compartment to the lens board on the front of the camera, changing its overall shape from a relatively compact flattened item to a body with a bellows at a right angle, extending on a bed.  That configuration became popular with roll film cameras into the 1950s.  The technology improved with self-erecting fronts (the front standard pops up when the bellows is extended), better shutters, better viewfinders, including rangefinder focus on some models of medium and 35mm format folding cameras.  Of course, the smaller the format, the shorter the focal distance for the lens, with 35mm cameras requiring a very short bellows to operate.  Thus, 35mm folding cameras, which date from the late 1930s into the late 1950s were an alternative to the solid-bodied 35mm cameras from Argus, Leitz and Zeiss.  The folding 35mm cameras were discussed by me in a previous post here on RCB.

Kodak Premoette Jr. No. 1, 1913. All those dangly bits 
are protected when it's folded.


The beauty of a folder is that once the front of the camera has been closed, it’s quite easy to carry in a pocket, and the optics are well-protected inside that closed camera. For 35mm cameras, it really makes them quite compact with no big protrusions to prevent them from being easily retrieved from a pocket.  Press a button and  they magically unfold, ready to use.

While the Kodak Retina series remain the best-known 35mm folders for good reason, other European companies made them, including Agfa, Balda, Beier, Certo, Voigtlander, Welta, and Zeiss Ikon.  


Balda Jubilette


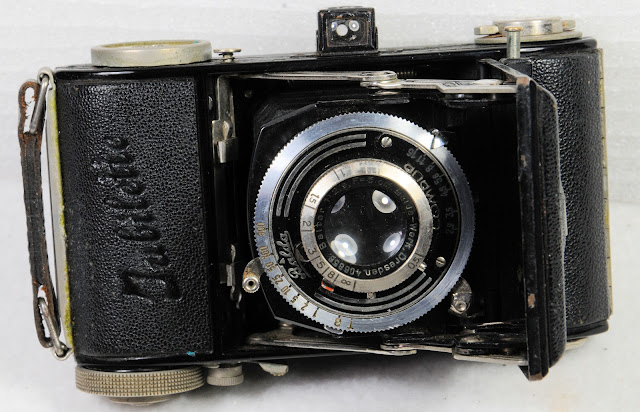
The Jubilette, so-named  for Balda-Werke’s 30th anniversary, is a pre-war (WWII) 1938-40 camera that is similar to the 1935 Baldina.  The Baldina has many variants with different lens/shutter combinations, and I suppose making the Jubilette was an easy way to honor the company’s 30 years.   It’s not a complicated camera, and it’s certainly capable of good results. It’s also not terribly different from a Kodak Retina 1. 


Some features of the Jubilette

The Jubilette in closed position. That's the shutter release
on the right of the viewfinder, on the extending bed.


The Jubilette that I have has a front release button on the top plate of the camera.  Push it in, and the front pops open, erecting the front with a nice solid-sounding klunk. The Compur shutter has speeds from T, B, 1-1/300 s, and the lens is a Baltar 5 cm f/2.9 with apertures down to f/16. 

The shutter release is on the left of the front standard (as you are holding it), which means your left hand controls the shutter release, and while not typical, it makes sense for this camera. The viewfinder is fairly simple, and does not correct for parallax. The close focus distance of this camera is 50 cm, which is pretty close. As you’ll see in a photo below, parallax correction would be nice.  


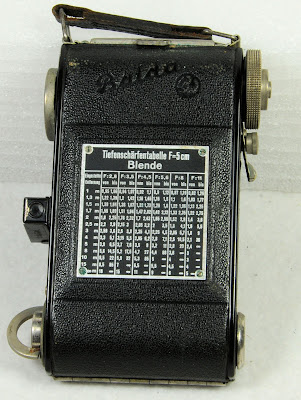
The back of the camera features a zone focus chart, which is actually quite useful.  If you are shooting at f/11, everything is in focus from 2.4m to infinity. Basically, that means you don’t have to refocus at anything from about 8 feet and beyond on a bright sunny day.  To focus, simply turn the knurled front edge of the lens mount so that the estimated distance is in line with the red indicator.


Follow the arrows to open the back


Note the unique take-up spool configuration.


Loading the film requires you to slide the chrome tab on the side upwards and push the back away from the body, which is easiest if you close the front standard.  Note that the little handle remains stationary, so don’t pull on the handle to open the back.  The first thing that you’ll notice is that the reception for the film leader does not extend to the edge of the spool. Instead there is a centrally place slot, which means that you’ll have to trim the film leader to fit in that slot.  To advance the film, you push down on the small knob next to the film advance wheel and let up as soon as you start turning the film advance clockwise.   The wheel will stop rotating once it has reached the spot for the next frame.

Press the smaller button down before winding on to the next frame.

Once you have advanced the film, cock the shutter by rotating the cocking lever clockwise. A small tab on the bottom of the lens sets the aperture, and the knurled front ring rotates  to choose the shutter speed.  This is called a rim-set shutter.  There is a screw-in hole on the edge of the front standard for a cable release.   If you wish to take a double exposure, simply reset the shutter.  My standard practice is to always advance the film after each shot, and not worry if I have already exposed a frame the next time I pick up the camera.

Aperture, shutter speed, and focus are all around the front.


When you reach the end of the roll, pull up the film advance wheel and rotate the keyed film rewind clockwise.   The frame counter on the top deck of the camera is an additive one, meaning that it shows how many exposures you have made.  When you insert a new roll of film, set the counter to zero by turning the raised center to get the number in the window to zero.


Overall, it’s a fairly easy camera to operate, and once you get accustomed to its workings, it handles pretty well, especially for an 85 year old camera.  Think about it.  This particular camera is in pretty good condition and works just as it should.  No bellow pinholes, either. I guess some jubilation is in order just for that fact!

Some things to remember 

If you hold down the film advance release button too long, you may advance more than one frame before the wind button stops turning.  So just do a brief push on that button and release it as soon as you start advancing the film.

Since there is no focus aid, you’ll need to guestimate your focus when you rotate the focus distance on the front of the camera. If you are shooting at f/16, anything past 6 feet will be in focus if set at the 2 m mark.

The viewfinder is approximate — it works to generally frame your subject, but it isn’t anything like a nice Retina IIc.


Some sample images

I shot a roll of Eastman 5231 an ISO 80-100 film.  Other than some blank frames where I wound on past the next frame, it had relatively good results.  Sometimes the frame spacing was tight, though.  


as you can see, parallax can throw you off.


Buying a Balda Jubilette

If the camera is in clean, working condition, expect to pay from $75 to $130 for one.  While they are not rare, they are uncommon, especially in the United States.  If you are looking at one, make sure all the functions work as they should.  Balda made hundreds of different cameras, and I suppose building a Balda collection would be quite an undertaking.  However, if you just stuck with their 35mm cameras, it would still be a formidable task.  Balda-Werke was destroyed in Dresden in 1945, and in 1946 moved to Bünde, West Germany, and the company renamed as Balda-Werke Bünde.  They manufactured cameras into the 1970s, often as an OEM for companies like Argus. 


Monday, March 10, 2025

Classic TLR - Mamiyaflex Automatic B


I have used a number of Twin Lens Reflex cameras over the past 25 years, and that includes Rollei, Yashica, Ciroflex, Argoflex, Kodak, Minolta, Ricoh, Meopta Flexaret, and Mamiya C-series.  Until now, I’ve never held a Mamiyaflex - a series of TLRs that do not have interchangeable lenses like those found on the Mamiya C TLRs. Thanks to my friend Kim, I was recently gifted a Mamiyaflex Automatic (Automat) B.  Looking much like a Rolleicord, the Mamiyaflex Automatic B was produced in Japan between 1954 and 1956.  It takes 120 film, of course, with 12 6x6 negatives on a roll.  

It’s been hard to find much on the Automat B, but the specs are as follows:

  • Taking lens is a Setagaya Koki Sekor, 75mm f/3.5
  • Viewing lens is a Sekor 75mm f/3.5
  • Shutter speeds B, 1- 1/500 sec in a Seikosha Rapid Shutter
  • Apertures f/3.5 - f/22
  • PC flash connector
  • accessory shoe on side
  • double exposure prevention
  • shutter release lock
  • knob-wind film advance
  • screw-in cable release socket
  • focus knob with depth of field scale and ASA indicator


The other features - pop-up lens hood, magnifier, sports finder option, bottom locking door cover with tripod socket are pretty standard.  But one other thing that is quite useful is a small window on the back that has a yellow dot showing when film is loaded in the camera.  That definitely saves one from accidentally opening the back while the film has been loaded. The “automatic” part of the name refers to the shutter being cocked as you advance the film, rather than pushing an arm on the shutter to manually set the shutter as you would on say, a Ciroflex.

In my opinion, this is a well-made camera that does not show up often.  I have seen many Yashicamats of all sorts, Ricohflexes, and the occasional Minolta Automat, but this Mamiyaflex is a first for me.  I can’t compare it to the Mamiya C series, as those cameras are definitely on the “pro level” and after having owned a C330 Pro F for almost a decade, comparing that camera against a much simpler TLR would not be a fair comparison. I can more easily compare it to using a Rolleicord III or IV. I think it weighs more than a Rolleicord, but operationally, it’s not too different.

My only complaint with this Mamiyaflex is the dim viewfinder, especially when compared to my YashicaMat 124.  I haven’t taken it apart yet to see if the reflex mirror is the culprit, or if it is the non-Fresnel frosted glass screen.  However, after shooting a roll of film with it, I am quite happy with the results.  In use, I find the controls easy to adjust, though not as easily as a Yashicamat 124 or a Rolleiflex Automat, with those thumbwheels that provide aperture and shutter speed control and a window right at the top of the front to see what they are.  In that sense, the Mamiyaflex is more similar to a contemporary Rolleicord.  However, the shutter speed and aperture markings are easy to read on the front of the Mamiyaflex.

I loaded a roll of expired Fuji Acros 100 into the Mamiyaflex, and shot the roll on 1/31/25 while at the NC Botanical Gardens near Asheville.  Developed the film in FPP D-96 for 10.5 minutes, and scanned the negatives on my Epson V700 scanner.  I’m pretty happy with the results from this camera.  


TLRs are pretty straightforward to use, and I think that they remain one of the best ways to enter into medium-format photography.  Mamiyaflex Automats go for around $150 on eBay, with most sellers from Japan.  That’s a pretty inexpensive entry into using 120 film.  Similar TLRs such as a Rolleicord IV, sell for nearly twice as much.  A previous post on TLRs is here.

Whatever TLR you decide on, shoot with it as much as possible. Embracing the square format and the perspective from a waist-level viewfinder is something quite different from 35mm.