Wednesday, September 29, 2021

DOOMO D light meter review

The DOOMO D meter matches the lines and finish of a Leica M2

Lately, we have all seen a number of extremely-compact shoe-mountable light meters such as the one from Raveni Labs, and the KEKS EM01.  These little wonders use a small OLED screen to provide the exposure information, with tiny buttons to change settings, etc.  My biggest problem with these ultra-tiny meters is that the screens are sometimes difficult to read, and that they are small enough to well,... lose.  I have been using handheld meters such as the Gossen Pilot Selenium meters (which work quite well) and the Sekonic L-208 Twin-Mate, a modern, still-in-production light meter.  I originally wanted a Voigtlander VC Speed Meter II, but with a price at over $200, it was more than I wanted to pay.

DOOMO D meter

Now, I think I have found a favorite light meter for my Leica M2. It's the DOOMO Meter D, which at first glance looks a lot like the Voigtlander VC II.  First of all, it has exactly the layout I wanted - an analog dial approach, just as you would find on a camera, with +/- red LEDs and a green one for the "correct" exposure.  It sits in the accessory shoe on the Leica perfectly, and looks like it's part of the camera.  The dials are easy to move, and the LEDS are easy to see in bright light.  On top of that, it has a metal case that looks robust and well-finished, and a perfect match for any classic camera.  However, looks are not everything. It also has to work well, be easy to use, and I need to have confidence in its accuracy.  The DOOMO D meter does all those things. 


Upon receipt of the DOOMO D meter  from Cameractive (direct from China), I was pleased to see it well-packaged in a black box.  Now, I am a pretty experienced photographer and familiar with all sorts of gadgets. The only information in the box is a small card that has brief instructions on inserting a battery (CR-1632 coin cell that is not included) and QR codes to take you to the online manual. I had no trouble figuring the rest out without looking online. The package also includes two shoe mounts, screws, a small black stick-on circle, and a small screwdriver.  My only quibble is that while the slotted head screwdriver fits the Phillips-head screws, it should be replaced by an actual Phillips head screwdriver.  However, if you need to use the manual, the online manual has all you need. If you have used a camera with built-in light meter such as a Nikon FM, then the controls don't need much explanation.  You set your film's ISO on the left wheel, - which ranges from 25-6400, and that wheel also has your aperture settings (f/1- f/22), while the right wheel has the shutter speeds (1 sec - 1/2000).  If like me, you are an aperture priority person, I set my aperture and move the shutter speed dial until it the LED shows green, or +/- 1 stop, and then I set my shutter speed on the camera to match.  Now the funny thing is -- it's entirely possible to forget that you have to adjust the camera settings to match what the DOOMO light meter is at.  I had a brain fart like that a couple of times, forgetting to transfer the meter settings to the camera. That's not a meter problem, it's a human problem!


You can attach the shoe connector to either the right side or the center, and the screws hold it firmly in place to the body of the meter. For my Leica M2, the meter needs to hang to the left of the shoe, and the placement is absolutely perfect.  

online manual


Results. After shooting three rolls of film with the DOOMO D light meter, I feel very confident in its metering accuracy.  It's made me use my M2 more often, and at only a hair over 2 ounces in weight, it's not even noticeable as an add-on.  The metering is easy - press the black button on the rear to activate the meter, and adjust accordingly for your exposure.  The meter has a 30° angle of view for the sensing, and that seems to work quite well.  The advertised battery life is 60 hours of continuous use, and that's a lot of shooting.  I recommend having a spare, just in case. You can get a package of 10 CR-1632 3V cells on Amazon for less than $6. That's the price of one at the hardware store.

underside of meter. The battery compartment is
securely closed with a screw.


Overall, I found the DOOMO D light meter to be just what I wanted - simple, accurate, stylish, and well-made.  For me, it's a perfect fit for my Leica, and I highly recommend it if you want an analog-style meter.   It's available directly from Cameractive as well as Doomo and some eBay sellers.  Also, take a look at the Doomo Instagram account, as well.  At a price of $125, I think it's very affordable and probably the least expensive accessory for your Leica that you will ever find. I thank Zhang at Cameractive for contacting me and sending the meter to review.  

rear view of the DOOMO D meter


Some images from the M2 with Ultrafine Extreme 400 film, using the DOOMO D meter


More images from my October 2021 trip to the Southwest US.  The Leica and DOOMO D meter make a great pair.

Tucumcari, NM, FPP Frankenstein 200 film

Cuervo, NM, FPP Frankenstein 200 film  

Cuervo, NM, FPP Frankenstein 200 film

Lordsburg, NM, Fomapan 100

Gila National Forest, NM, Fomapan 100

Gates Pass Rd., Tucson, AZ,  Fomapan 100


Sunday, September 19, 2021

I AM SPARTUS!


The Spartus 35 and 35F  cameras were sold from 1947-1954, and were manufactured by Spartus and then the Herold Manufacturing Co. in Chicago.  Although they are basic 35mm cameras, there are several iterations under the name, some with more than 1 shutter speed. All have several apertures.  While they somewhat resemble an Argus A, they are nowhere near the precision of that camera.  Lenses are inconsistent in results, and the cheap construction, rough finish, and lack of accurate control make them definite candidates for the Low-Fi camera selection.  Produced in the post-war photography boom, the Spartus 35 sold for about $12.00 - $29.00 depending on the model and the year.  The latter version of the 35 has a more streamlined styling, but no real change in features.  

 Spartus 35 F and the Spartus 35 front views

Spartus 35 F and the Spartus 35 back views. Note the differences
between the two


interior of Spartus 35F


While researching the Spartus cameras, I believe I found an error in Glass, Brass, & Chrome by Lahue and Bailey (2002 reprint by Univ. of Oklahoma Press, 347 pp.).  The authors claimed that the Falcon cameras – cheaply built 127 snapshot cameras that resemble a 35mm camera, had one model that was 35mm.  I have looked in every catalog and on-line source, and there is no evidence of a 35mm Falcon.  However, the interesting thing is that the Falcon models were originally made by the Utility Mfg. Co. in New York, until 1941, when the Spartus Corp. bought the company and moved its operations to Chicago.  This is where things get a little fuzzy, as Spartus then became the company name, producing a dizzying array of cheap 127, 120 and 620 cameras under various names, as well as clocks and razors.  In 1951, Harold Rubin bought the company, and renamed it Herold Mfg. Co., still at the same address on Lake Street in Chicago. So, in the end, it is certainly possible that some part of the Falcon 127 body molds may have been modified to make the Spartus 35, but there was no Falcon 35mm.  Also noteworthy – on the face of my Spartus 35 it reads NOT INC. under HEROLD MFG. CO., meaning that it wasn’t incorporated.  The Spartus 35 was the only 35mm camera produced by the Spartus and Herold companies.


I picked up a Spartus 35F on eBay just a little over a week ago, and paid $15 plus shipping.  I was amazed that the leather case with it looked practically new.  That’s a lot of years  - close to 70, without much use. I had to add a bit of oil to gt the shutter to function as it should, and as there are only two shutter settings – Time and Instant, not much to worry about.  There are four aperture settings – f/6.3, 8, 11, and 16.  The body is Bakelite, with aluminum and brass parts. The back opens by releasing a spring catch on the left side. The film loads on the right side, with the takeup spool on the left.  An aluminum button on the back is pushed in every time you wish to advance the film, which releases a cam that does one rotation as the film advances. You must manually reset the frame counter to 0 before loading the film.  

There are a few differences, other than the styling between the black plastic Spartus 35 and the last iteration – Spartus “35” with a gray plastic top deck and brown body.  The last version has the film cassette on the left side, and the takeup spool on the right.  The flash contacts are moved to the right side, and the frame counter to the left.  A push button on the right side opens the back, which is fully removable, and the button to allow the film to advance is on the lower right side of the back.  The tripod socket has moved to the center, rather than the left as part of the takeup spool assembly. Also, instead of using actual f/stop numbers on the front rotating selector, it has dull, cloudy, hazy, and bright. 

Overall, a fairly simple camera to operate. While the lens rotates to focus from 4 feet to infinity, it’s pretty much guesswork. Since I was shooting mostly at f/11, with a roll of Ilford Pan-F, most subjects were over 50 feet away.  Closer shots ranged from 10 feet to 40 feet, so really, at f/11 or f/16, I don’t think the focus is as critical.  The viewfinder is just an approximation of what will be in the frame.  

I took the Spartus “35 F” on a walk through the River Arts District in Asheville, which is my usual place to shoot and test new cameras.  It was a hazy sunny day, so f/11 it was, and I shot the roll of Pan-F pretty quickly as I walked through the area.   I developed the film in Rodinal 1:25 for 6 minutes, and when the film was hung to dry, I was amazed at the quality of the images.  My work on the shutter had paid off, as every frame was exposed pretty well.  I purposefully did one multi-exposure frame as 3 shots at f/16, and not too bad.  The frame spacing is pretty tight, and the actual frame size is 24x37.5 mm.  There was a small crescent shadow in the lower right corner of the frame (actually upper left in the camera), which turned out to be from a wire connecting the flash contacts to the shutter.  I pushed it upward away from the film gate, so future shots should be fine.  

Here are a few images from the 36 exposure roll of Pan-F. 


triple-exposure


I am pretty impressed with the quality of the photos, and a low-speed ISO film such as Ilford Pan-F is perfect for this camera.

If you want to read more about the Utility/Spartus/Herold history, here are some links to follow:


Sunday, September 12, 2021

LOMO SLOOOOW B&W Films


Lomography continues to surprise us with its array of films, and the two b&w cine films in its latest offering - Babylon 13 and Fantôme 8 certainly will appeal to a smaller group of photographers.  Before I discuss these two "new" films, I should add that they fall within Lomography's Kino subset of films - purported to give cinematic effects to your images.  These four b&w films - Berlin, Potsdam, Fantôme, and Babylon are rebranded Orwo cine film stocks.  I previously reviewed Berlin and Potsdam in 2020.  

The Lomo Kino family (from Lomography)

I give credit to whoever writes the ad copy for Lomography:

From the Babylon Kino page -- "Delicately capture the details of life’s most emotive moments with this moony-eyed monochrome." and the Fantôme Kino -- "Effortlessly evoke the theatre in your everyday life with this show-stopping black and white beauty."

So if that doesn't pull you in, there's more:

Fantôme Kino-

"This panchromatic is perfect for seasoned professionals and creative first time photographers alike. Particularly appropriate for those who like to take full manual control and experiment with flash photography, the Fantôme Kino B&W Film packs drama into the frame with crushed shadows and super high contrast renderings, reminiscent of our favourite Film Noir classics."

The key takeaway here should be that these are low-ISO films and at ISO 8 (Fantôme) and 13 (Babylon), they are not going to be used in your crappy plastic Lomo cameras. You'll need an SLR or a decent rangefinder camera that can meter to and ISO of at least 12, preferably 6.  Or, use a handheld meter or phone app that can meter at low ISOs.   Since they are so slow, a tripod will greatly assist in making the longer exposures.  

The other factor to consider, is that both of these stocks were created for cinematic uses, not for conventional still photography.  Just as I wrote about Kodak's cine films on the Film Photography Project Blog, some b&w  cine films are used for effects, titling, and making direct copies from the negatives.  The specialized films have narrower exposure latitude, may be orthochromatic, and will almost certainly have a low speed.  

The great thing is that Lomography decided to offer them as something that may get your creative juices flowing, and allow you to experiment with some film stocks that you might never see otherwise.  After all, ORWO isn't the most expressive film company, and they cater to professional cinematographers, not a bunch of amateur shutterbugs. So having Lomography do the hype and selling of these films is a sure way to have people try them.

I purchased these films from B&H  and of course, they arrived very quickly.  I bought two rolls of each, and shot a roll of each a few months ago.  

Lomo Kino Fantôme 8

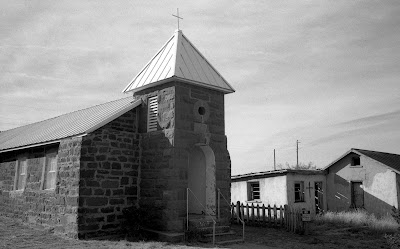
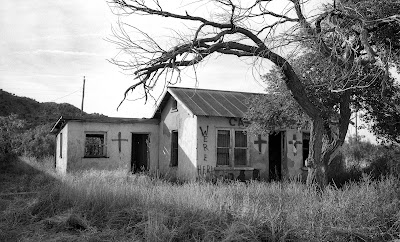
If you can set your camera  ISO to 8, that's great. If it only goes to 12, you can dial in +2/3 of a stop for the extra exposure that is needed.  I loaded my Nikon F100 with the Fantôme, and shot the entire roll along the French Broad River at Ledges Whitewater Park.  It was getting close to sunset, and my exposures were between 8 and 12 seconds. I was using a 28mm Nikkor at f/16.  I felt that the long exposures would be interesting with the moving water and shadows on the water. Tripod, of course.

I developed the film in FPP's D-96 for 6.5 minutes at 20°C.  The film base is clear, and curls like crazy when dry.  It wasn't much of a problem to scan though, as the curl is lengthwise, and not cupping the negatives.  The scans did not need much tweaking, and I really loved the results - moody, sharp as a tack, and I think it's one of those films that have a special use - and it works perfectly for what I was shooting.


Lomo Babylon 13

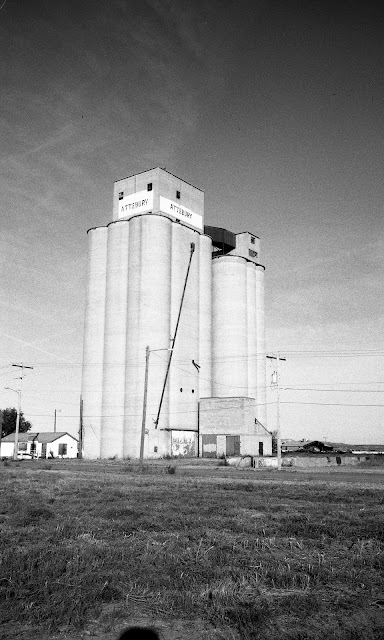
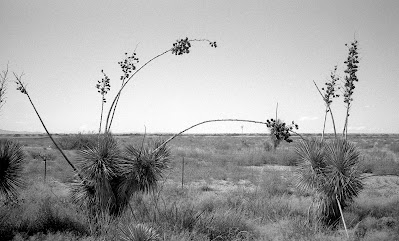
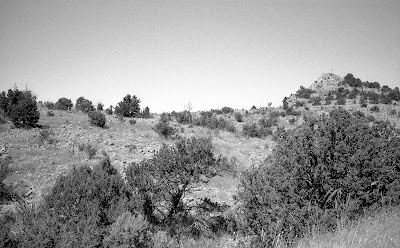
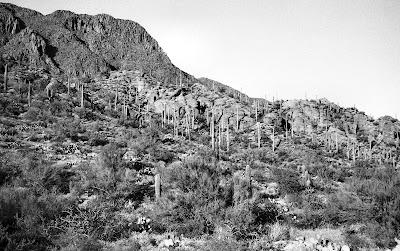
I loaded my Nikon F4 with the roll of Babylon, and set the ISO to 12.  I also used the 28mm Nikkor with a yellow K12 filter and polarizer to get dramatic skies that I knew were coming in that day.  The clouds were coming towards the Blue Ridge Parkway, and it didn't take me too long to shoot  the 36 exposure roll.  I also used a tripod.    I developed the film in HC-110B for 8.5 minutes at 20°C.  The film base isn't absolutely clear like the Fantôme. I had some odd vertical stripes show up on some frames, and I don't know the exact cause, though they look like a light leak .    The skies were appropriately dramatic, though the film's shadow detail could be better. I may have to shoot the next roll on a cloudy day and a different subject and see what I get.


Of the two films, I liked the results from the Fantôme better, but both could use more testing, as a single roll doesn't tell me much, except what I got under quite different circumstances.   One thing that I am not a fan of is the plastic film cassette that Lomo has been using for these films.  I usually pop open the metal cassettes, but with the plastic two-piece cassettes, I end up having to use a leader retriever and then pull the film out of the cassette.  So long as you know this ahead of time, it's not so bad.  

Are these films for you?  If you like experimenting with low-ISO films, I recommend them.   They are not snapshot films in any sense.  Home-developing is almost a must.   The only other way to try these films would be to buy a 200 ft reel from Orwo, which for most of us, is not going to happen.  At about $9 for a 36-exposure roll, they are not that expensive, and many places are selling the films.   If it's your first foray into slow films, be patient and use a tripod!  


Friday, September 03, 2021

Keep using those M42-mount lenses on newer non-M42 bodies

 As I have written here often about M-42 mount lenses and cameras, you know how I love those Pentax Takumars.  There are many thousands of them in circulation, and most of them are still in good working order. The same can't always be said for M-42 mount bodies.  Meters die, shutters get old and cranky, and just because of age and abuse, those lovely (and some not so lovely) M-42 mount bodies can become unreliable.  Some are really heavy, too, which negates the benefit of those Takumars. 

When Pentax released their K-mount bodies, they also sold M-42 to K-mount adapters. Everything was the same as far as flange distance, so you could still keep using your screw-mount lenses on the Pentax K bodies.  However, that only allowed you to use the lens in manual stop-down mode for metering -- which you were probably already doing with a Spotmatic. So that's not a big drawback to their use.


Fast forward to today, and the best replacement would be to use one of the Vivitar V3800N K-mount bodies, which are relatively recent, as SLR bodies go.  Those bodies also appeared as other brands, such as the Promaster 2500 PK Super.  You get a lightweight body, red/green diodes for the metering, a top shutter speed of 1/2000 sec, multiple exposure capability, self-timer, a PC and shoe flash ability, and depth of field preview - because you are shooting in stop-down mode.  

The M-42 adapter in place

Be sure to move the aperture switch to Manual

Look at that beauty.


Another option is to use a Minolta Maxxum 7000 - which are plentiful and cheap.  You can find a Sony Alpha to M-42 mount adapter, and shoot in Aperture Priority or Manual modes.  Just like that, you have an M-42 mount camera with auto film advance!  Other Minolta AF bodies may also work well with the M-42 adapter, but I have not tested them.  Again, you'll need to use the lenses in Manual, not Auto mode, so they might be a bit dim for focusing in low light conditions.


There are other M-42 mount adapters for other bodies, such as Nikon, but they don't focus to infinity. Sticking with a K-mount body and M-42 adapter is the logical choice, especially if you already have a camera such as the Pentax ME.  However, the Vivitar 3800N remains a very good and inexpensive option to continue using the wonderful range of screw-mount lenses. on a small, lightweight body with modern electronics.

Of course, there are mounts for the latest mirrorless digital cameras, but we are talking only about using film cameras here.  The M-42 Pentax Takumar lenses are compact. I have a kit with a 50mm f/1.4, 24mm f/3.5, 105mm f/2.8, and a 17mm f/4 along with a Spotmatic F, filters, etc. and it occupies about 2/3 space  and weight that a Nikon kit has with similar lenses.  

So, give those old Takumars a new life with a newer body, and adapter.  You'll quickly realize how nice those old lenses are.