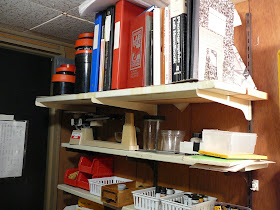
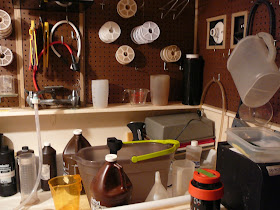
I thought I would share some thoughts about my darkroom, and what I hope for in its next reincarnation, as in a few short months it will have to be packed up for wherever its next home will be.
We purchased our current home in December 2002, from Bill and Margaret Brudon. It was a private sale, and it all came about because Bill had been a great mentor in photography to me, and we always enjoyed their home. We moved a mile and sold the home we had purchased in 1984 and in the span of a few days, closed on two home transactions, cleaned the old house, and moved into our current home, which, because it did not go on the open market, was much like moving into your parent's old house. My wife and I did a lot of cleaning and decluttering, and we never missed our old home once. This house is a mid-century home with real plaster walls, cove ceiling in the living and dining rooms, red oak flooring (which is just now being refinished this week). It also came with a 5x7 darkroom in the basement, fully furnished, since Bill was leaving that behind. This darkroom allowed me to explore b&w photography as much as I wished, and I have spent many hours there developing film, listening to music, or more recently, The Film Photography Podcast, and WCBN FM, a public radio station at UM that plays an amazing variety of music.
I have not printed a single b&w photo in the past 3 years, and I miss doing that. I used to print a lot, and got fairly good results, but now I only print if I am doing a show. That seems a bit stupid in hindsight, but I really didn't want to be inundated with prints without a purpose. I hope to change that in the coming years, and wherever our new home will be, it will have to have space for my new expanded darkroom. I am torn as to take the darkroom sink with me, or leave it. It's perfect for the space that it is now. I'll have to wait and see how I feel as a real move approaches.
The walls on one side are paneling, and as you can see, cassette wrappers are stuck to it. The other sides are masonite peg board, which had been painted black by Bill. My new space will have no black walls. This is a comfortable one-person darkroom. Put two people in there, and it's awfully close. I want to be able to do film photography workshops in the future, so more space would be desirable.
This darkroom has performed well for two different photographers, and I very much doubt the next owner of the house will want it used. Maybe it will make a good space for something other than photography, but I suppose it will get torn out someday. A lot of "me time" has been spent there, developing, thinking, and isolated from whatever is going on outside in the world. Those of you that have a darkroom will know what I mean. It's not so much that one is isolated, but free from distraction to print and to ponder, to develop that next roll of film and still feel the magic that is inherent in the process, and to think about new projects and continuing old ones.
So, sometime in the next few months, I will be boxing all of the stuff up to take to a new adventure. I have already divested myself of materials and equipment that I don't need or use, and while there will still be some junk to be tossed, everything else goes to NC with us.
Tuesday, February 26, 2019
Saturday, February 23, 2019
Boxing Things Up.
As some of you know, my wife and I are planning on moving to Asheville, NC later this year. Right now, we are beginning a series of home renovations, and doing a lot of moving things around, some preliminary boxing up, and I won't have the opportunity to do any extensive blogging like I have. Camera tests and film testing will be off for awhile, as well. I am not sure when I will have some really free time to pursue these things, but I am guessing after April. We'll see. I am currently decluttering and packing some things away for a few months. Things I am not necessarily needing to access until we are settled.
While boxing some items, I found a bunch of CD's with photos on them, and yes, they are all labelled with the pertinent information. I pulled one out, and it was from The Darkroom, and it contains scans from a September 2014 road trip that Marc Akemann and I took to Monroe, MI and places around it, including Luna Pier. All of the following were taken with a Konica FS-1 that I had, and I have no idea when I sold it or gave it away, but I think I divested myself of all Konica stuff in 2015. All these images were on Hawkeye Surveillance Film, a nice C-41 color film from Kodak. I wish that I had bought about 4 100 ft. rolls when I had the chance! Some of these have been cropped from the 35mm frame to square format.
As I recall, I liked the FS-1. It was the first 35mm SLR to have a built-in motor drive in 1979. It had a weakness with the battery holder, though, and that was a sore point with an otherwise nice camera. It's fun finding some things that I have not looked at for a while, but I better keep packing, as the contractors are coming Monday to refinish all the wood floors! I'll see you again in a month or so!
Mark
Friday, February 15, 2019
Shooting with a Leica IIIa - One roll review
Let me begin by saying that I am not a fan of the Barnack Leicas (all models that predate the M series) for glasses wearers. In my humble opinion, the viewfinders are not a whole lot better than that of an Argus C3. I feel quite differently about the M series. This particular Leica IIIa came my way as part of an estate to auction off. I try to test cameras as much as possible before selling them, and sometimes that includes running a roll of film through them. Now, onto the camera...
This Leica IIIa was made in 1937, according to its serial number and online data records. So, here is a 35mm camera that's over 80 years old, looking pretty much like it was made yesterday. That's not going to be the case with most cameras, including Leicas. However, it's jewel-like appearance invited me to take it out and test it. I suppose the ever-ready leather case kept it looking so good all these years. It's as if a time machine dropped the camera into my lap.
Okay, it looks great, but how does it work? One of the pitfalls of using the Barnack Leicas (and the Ukraine-Russian copies) is that you must trim the film leader to the right shape so that when you blind load the film from the bottom, it does not bind up with the gears. Once you have that accomplished, you are ready to shoot. It's pretty easy once you get the hang of it.
The weather has not been conducive to going out and testing a camera such as this, but finally I had an opportunity to do so last week. I loaded up an expired roll of Plus-X pan and used my "sunny-16" mojo for estimating the exposures. One nice feature of the IIIa is that you can set the rangefinder viewer to infinity for quicker street shooting. In full afternoon sun, making an exposure is pretty simple.
I won't get into the differences between the different Leica models, as I am not a Leica historian, and you can look it up elsewhere. However, the operational differences between the IIIa and a more recent IIIf are not many, the main differences being flash synchronization and a self-timer on the IIIf. Both have a front slow shutter speed dial for speeds below 1/20 second. It wasn't until the modern Leicas - the M series that all the shutter speeds from B- 1/1000 were on one dial.
I have to say, the Barnack Leicas are simply wonderful pieces of craftsmanship and are relatively easy to use. They are very compact, use no batteries, and with a lens such as the collapsible Elmar f/3.5 lens, can easily be carried in a coat pocket or a small pouch. You have to make sure that the collapsible lens is fully extended before shooting. So long as you can be comfortable with the tiny viewfinders they are really worth investigating if you want to shoot with a Leica. The prices are far lower than the M-series, except for rare models or those of historical importance.
The Leica IIIa performed well, and I did get some decent images from it. The expired Plus-X Pan was very curly and cupped after developing and drying, and I had to weigh the sheet of negatives down for a few days to get them flat enough to scan properly. I wish I had used a roll of Iflord FP4 or Ultrafine Xtreme 400 instead!
I was able to test the camera thoroughly, and it's now up on eBay. I hope that whoever buys it takes it out to shoot and does not let it just sit in a display case. These cameras are wonderful tools, and should be used!
Sunday, February 10, 2019
Street Candy ATM 400 - One Roll Review
There has certainly been an explosion of boutique-branded 35mm films of late. Some of them are new emulsions, such as the Ferrania P30 and the Bergger Pancro 400 b&w films. Others, such as Kosmo Foto Mono 100, Lomography’s Berlin Kino and Lady Grey films are merely repackaged and relabeled films from the OFM (Original Film Manufacturer) that are standard well-known film stocks. On the other hand, we have the JCH Street Pan, and now the Street Candy ATM 400 films that are non-standard emulsions from OFMs that were designed for other purposes but have found their way into our 35mm still cameras due to the enthusiasm and diligence of the people that brought them to market. Add to that list the new films from the Film Photography Project under the Derev Pan label. Mike Raso gave me a roll of the Street Candy ATM film to test, and finally, after over a month of delay, I have finished the roll and developed it. Of course, you can buy this film at the FPP Store!
What is it?
Vincent Moschetti introduced this film in 2018, and the original use for it was in surveillance cameras in ATM machines. Because of that, the OFM produced the emulsion on a thin polyester base so that more film could be loaded into a reel for the ATM cameras. I did not test this earlier version of Street Candy, but I suspect that it was similar in handling to some of the thin base films from Svema. The Street Candy ATM 400 that I tested is on a thicker polyester base, and is easy to handle. Vincent makes the case that the Street Candy ATM 400 gives a "gritty" look to street scenes, and yet delivers a good range of tonality. The data sheet for the film gives some standard processing times, and he recommends that the developers and times for Ilford’s HP-5+ can be applied to the Street Candy ATM 400 film. So, as to the identity of the OFM, maybe it’s Ilford? In any case, it’s good to see an emulsion that does not require me to test for the best developer/time combination to get usable results or require some strange developer that I don’t normally use. I love the 80s-look of the branding, and Street Candy implies some slightly illicit activity.
My results
I originally loaded the roll into my Nikon FA when I was in NJ for the FPP recording sessions. I shot about a dozen frames in NJ, and about a month later I took the FA out to shoot, and when I went to take some photos I realized that the batteries had died. I shot a couple of frames using the manual 1/250 sec and came home. I decided not to trust the FA in cold weather, so I rewound the roll and loaded it into my very trust-worthy Nikon FM. Therefore, the remainder of the roll was shot yesterday in downtown Ann Arbor.
I developed the Street Candy ATM 400 in D76 1:1 at 20C for 11 minutes. Standard agitation, and a water rinse to stop, and then 8 minutes in fixer, followed by a 1 minute water rinse, archival wash, another 1 minute rinse, then a final soak in distilled water with Photoflo to avoid spots from the Ann Arbor water. I hung the film to dry overnight and scanned it this morning.
The film has a slight cupping to it, and does not lie perfectly flat like I would have expected. Once I cut the film into strips to fit the scanner holder, the remaining film still hanging curled up like a spring. That too, was unexpected. So, perhaps I am wrong about the backing being polyester. The film scanned fine, and I did not have to tweak the scans to achieve a proper "look". I am presenting the scans here without any post-processing other than to remove dust spots and stray cat hairs (!!!!).
I find the overall results to be quite satisfactory, and the film’s grain is not detrimental to the images, and is in fact, very nice. I shot the film under a variety of conditions, and I certainly find it to be better for me than the results that I got with JCH Street Pan. It’s a bit different of a look than I get with my go-to film Ultrafine Xtreme 400, but not too punchy. If you are looking to try something different, I think you’ll like Street Candy ATM 400. For me, I’ll stick with a film that I already know and love, and that would be either Ilford HP-5+ or Ultrafine Xtreme 400. The slight cupping and spiraling of the film after it dried was unexpected, and is a minus for me. I like my film to lie perfectly flat, and that's what I get from my favorite films. Still, after all is said and done, the Street Candy ATM 400 is worth a try, and you may like the look that it gives to your images.