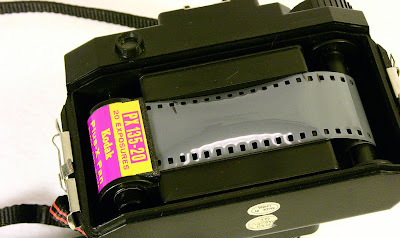
Last month I bought a 35mm adapter kit to use in one of my Holga cameras. The ebay seller in China was offering them as a Buy-It-Now with shipping for about $13. I figured that I may as well go for it, as the prices elsewhere were much higher. A few weeks later the item arrived in a neat little package. It consists of a new back, mask with film holder, and two stickers (more about them later) for the wind knob, as well as an instruction sheet.

Now, there are ways that you can use 35mm in a holga with minimal purchase. Tape over the red window, make a mask yourself, etc., and there are instructions online for doing just that. All of them are somewhat kludgy, and this kit is pretty simple and straightforward.
1. Remove the existing camera back and the 6x6 or 6x4.5 mask that is already in place inside the Holga.

2. Insert the new 35mm mask -- it basically gives you a 24x55mm (excluding the sprocket hole area) negative. Note that the 35mm canister fits into a niche on the left side of the camera.

3. Insert film canister and tape end of film leader to the 120 take-up spool. Start winding the film onto the spool and then attach the new back.

4. Now you are ready to go and shoot some film.
The 24x55 negative size is slightly longer than a frame and a half. Not quite what one would consider "panoramic", but it's not bad, and gives me a whole different type of image from the Holga. It's obviously better than the cropped 24x36 image that is called "panoramic" with the point and shoot cameras, which is about 12x36mm. Note that in the photograph above, I used an old roll of film that I have used before to test out winding schemes with 120 cameras and 35mm film. That's why there are marks on the film. If you simply wind the film for 36 clicks of the winding knob, you will get no overlap on your images. However, as the rolled film gets fatter, the images will be spaced out unevenly, unless you reduce the number of clicks as you shoot through the roll of film. That's what I found out before I realized what the stickers are for.

When you wind on to the first exposure (determined by the "1" on the knob, and then to the second, note that it's almost a turn and a half, or 36 clicks. From 2 to 3, it's maybe 34 clicks, and so on in decreasing order, so just pay attention to the numbers on the wind knob as you progress along the roll of film. That will keep the frames evenly spaced apart.
Now what? Once you get to the end of the roll, you will need to have a black cloth film changing bag or a darkroom so that you can open up the camera and remove the cassette, still with the film attached to the winding spool, and then rewind the film back INTO the 35mm cassette. It will look like this (but since you are in the dark, you should not see THIS.

DO NOT, I repeat, DO NOT open the camera to rewind the film in the light. You will lose all your images. This may seem obvious, but after reading threads on Flickr, I no longer believe common sense has permeated the latest generation, especially one that has only grown up with digital.
Once you have removed the cassette, you can either develop the film yourself, or if it is C-41 or E-6, take it to your local processor, and make sure that they DO NOT CUT the film strip after developing! These are not standard 24x36mm frames. Nor will they be able to print them. That, my friend, means that you will have to scan them yourself. If you shot regular b&w film, you'll have to make a mask for your enlarger (just mask a 6x6 holder) as the standard 35mm film mask won't get all the image.
This is a lot of fun. You will have to frame your subjects in the Holga viewfinder so that the center contains the image you want to shoot.
I look forward to doing more with this!

Am I right in thinking that if you left out the new mask, you would get a full frame exposure, including the sprocket holes?
ReplyDeleteActually, the sprocket holes do get exposed with this mask, but since I put the film into a standard holder for scanning, they get covered up when I scan them in.
ReplyDeleteAh, I see. Thats good to know. Oh well, looks like more spending will be required soon. need to assemble my Gakken-flex first though.
ReplyDeleteI must stop reading this blog - first the Gakken, now the 135 for Holga and Ive managed to find a VUWS on Ebay too!
This seems like a painless, carefree way to use 35mm in the Holga. Can you please provide a link for the ebay seller for this item?
ReplyDeleteThanks, I should have done that! It is here: http://stores.ebay.com/XinHaicc-Store
ReplyDeleteIt's amazing that you could get a 35mm in there, a brilliant trick.
ReplyDeleteI must admit though, I'm not sure I could be bothered messing around with dark bags and dark rooms though. I just don't get the time these days and I'm not very patient which doesn't work out well with things like this.
Thanks for the tips anyway. Amanda
I looked and looked and your's is the only webpage I could find with the proper wind one sticker for the 24x55 mask. I had to reshape it to a perfect circle, but it wasn't too much trouble. Thanks!
ReplyDeleteI'm glad that I could be of help!
Delete