I recently posted about using an expired roll of Kodak HIE IR film, and while it is certainly an amazing film - largely due to the fact that you can get excellent results just by using a common R25A red filter, it’s sadly no longer manufactured. However, I also listed a bunch of b&w films that have IR sensitivity and work well with a R72 filter. The downside of that R72 filter is that it is nearly opaque, and you really cant’t use an SLR for composing an image without taking the filter off, composing, and putting it back on for the shot. I was able to find a 40.5mm screw-on R72 filter that fits a 53mm f/2.8 Industar LTM lens on my Canon 7 rangefinder camera. That made a big difference in making IR photography easy!
The Canon 7 has an external Selenium meter, which I never use. From my experience and what I have seen, indicates that with a 200 ISO film with a R72 filter, I’ll need to set my aperture at f/16 at either 1 sec or 1/2 sec in full sun. You really can’t use an internal meter for IR, as the R72 filter cuts out most of the visible light. Generally, that’s about 5 to 8 stops of light, so that is going to be in the realm of 1/8 to 1 sec, depending on the quality of the reflected IR and the film used. Bracketing exposures is your friend.
The Infra Red film from the Film Photography Project is rated at ISO 200, without a filter. It’s also on a very thin Mylar base. Load the film indoors. Make sure it’s engaged on the take-up spool before closing the back of the camera. I suggest using a rangefinder camera or even a zone-focus 35mm with a R72 filter on the lens. Some photographers have used 35mm Holgas and the B setting. You won’t be looking through the filter like you would in an SLR. That’s a BIG help! If your lens has an IR focus mark (not all lenses do), use it, but if you are shooting at an aperture of f/11 or f/16, it’s not going to be a big deal. Set your shutter speed to 1/2 sec to get that full “Wood effect” of white foliage that makes IR photography so surreal. Don’t over-think it. Keep your aperture constant at f/16 and yes, use a damned tripod. You can forgo the tripod if you open your aperture to f/5.6 at 1/30 sec, but you will lose the greater depth of field that f/16 provides.
I’ve shot several rolls of the FPP Infra-Red, and overall, I am very pleased with the results. You won’t get the exact same results as the Kodak HIE film, which did not have an anti-halation coating. So, with that film, you also got some “blooming” from bright subjects that you won’t get with the other films currently available. You MUST use an R72 filter with this film, as there is too much visible light coming through with a red 25A filter. The R72 filter starts at 720nm of light wavelengths, which is in the infrared spectrum. You CAN shoot this film as a normal 200 ISO b&w film, and get good results, as it is very fine-grained. However, use it as an IR film for its spectral sensitivity and the unique images that you’ll get.
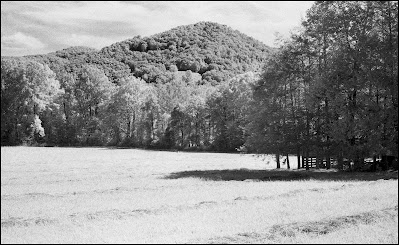
Examples from two rolls:
Roll 1 shot with a Nikon F... Developed with D-76


No comments:
Post a Comment
If you are trying to spam, sell digital crap, link to an external sales site, it will be deleted. I welcome respectful dialog and comments.